
If you haven’t already begun the initial startup, you’ll need to go back to PenTest Edition: Creating an Evil Twin or Fake Access Point on Your Home Network Using Aircrack-ng and Dnsmasq [Part 1 – Setup] and update Aircrack-ng and configure the dnsmasq configuration file. After that, you can come back here and begin the attack.
The information provided on the cybersecurityman is for educational purposes only. I am in no way responsible for any misuse of the information provided. All the information here is meant to provide the reader with the knowledge to defend against hackers and prevent the attacks discussed here. At no time should any reader attempt to use this information for illegal purposes.The information provided on the cybersecurityman is for educational purposes only. I am in no way responsible for any misuse of the information provided. All the information here is meant to provide the reader with the knowledge to defend against hackers and prevent the attacks discussed here. At no time should any reader attempt to use this information for illegal purposes.
Step 1: Enable Monitor Mode on Wireless Interface
The first step in this tutorial is to enable Monitor mode on our wireless interface wlan0 (or whatever interface you are using). This can be accomplished by executing the airmon-ng start wlan0 command.
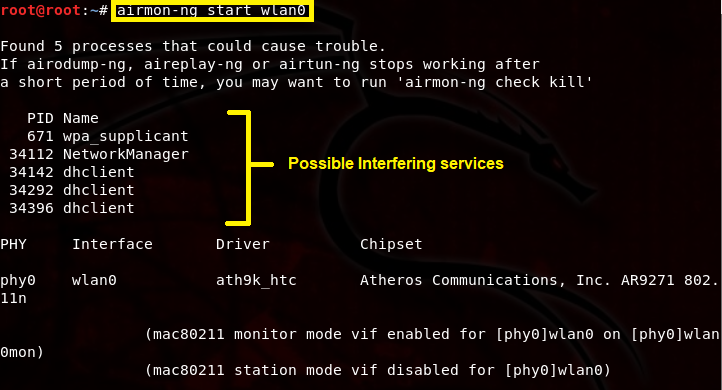
This will change wlan0 to wlan0mon, which indicates that our wireless interface is now in monitor mode. Some processes may interfere with airodump-ng and aireplay-ng, so it’s a good idea to kill these processes by executing airmon-ng check kill.

When you are finished with this attack, we can bring back up NetworkManager again with the service NetworkManager restart command. We can also bring back up wpa_supplicant with the service wpa_supplicant restart command.
Step 2: Locate the Target Wireless Network Using Airodump-ng
The second step is to use airodump-ng to list out currently running wireless networks in our vicinity and locate your home Wi-Fi network we would like to clone. If your objective is to just create a fake AP, then you can skip this step. Execute the airodump-ng wlan0mon command. Wait a while until you see your wireless network you want to clone appear in the list. When you find it, press [ctrl+c] and leave the terminal open.

The wireless network I will be cloning in this demonstration my HOME-5432 network with BSSID FC:51:A4:01:18:D6. And, as you can see at the bottom, there is already a wireless client (me) associated (connected) to this network. This is a good thing because it makes the attack much easier later on.
Step 3: Create an Evil Twin or Fake AP Using Airbase-ng
Now that we have the information we need, we can create an Evil Twin using airbase-ng. Execute the airebase-ng -e [network name] -c 11 wlan0mon command and leave the terminal open. Obviously, you will be using the network name of the network you want to clone. Or, if you are just creating a Fake AP, it can be any network name you want, such as “Anonymous,” “Free WiFi,” “You Suck,” and so on. My real HOME-5432 network is running on channel 11.

This command creates an Evil Twin of my HOME-5432 network and it should appear in the network settings of the wireless client; however, it will not be able to provide Internet access yet.
As we can see, the evil twin popped up on my network list on my iPhone. It has no encryption set. As far as I know, airbase-ng only supports WEP encryption whereby you can specify the WEP key, but not WPA/WPA2. If you want your evil twin to have the same encryption scheme as the legitimate AP, you can try using hostapd. I think I’ll give hostapd a shot in another post, so when I finish that, I’ll append it here.
Step 4: Configure Interface at0
As we saw in the last step, airbase-ng sets the evil twin on interface at0. We must bring this interface up, configure it, enable IP forwarding, and other parameters. Open up a new terminal, and execute the following commands.

Here is what these commands do:
- ifconfig at0 up brings up the at0 interface. You can verify it’s now up using the ifconfig command.
- ifconfig at0 10.0.0.1 netmask 255.255.255.0 sets the at0 interface IP address as 10.0.0.1 and the subnet mask as /24.
- route add -net 10.0.0.0 netmask 255.255.255.0 gw 10.0.0.1 creates a static route in our routing table so that any traffic from out clients will be forwarded to the real gateway at 10.0.0.1, which is a part of the 10.0.0.0/24 network.
- iptables -P FORWARD ACCEPT creates a policy to accept forwarding in the chain target. This makes our Linux machine act like a router (even though it isn’t).
- iptables -t nat -A POSTROUTING -o wlan0mon -j MASQUERADE allows us to route outbound traffic without disrupting the normal flow of traffic on the network. The masquerade option kind of acts like Source NAT. See here for more information.
- echo 1 > /proc/sys/net/ipv4/ip_forward enables IP forwarding. The “1” enables IP forwarding while a “0” disables it.
Step 5: Run dnsmasq
You can clear that terminal, but again, continue to leave the airbase-ng and the airodump-ng terminal open. Now we will run dnsmasq using the configuration file we created in Part 1. Recall that this file is located in /Desktop/eviltwin/. Execute the dnsmasq -C Desktop/eviltwin/dnsmasq.conf -d command and leave this terminal open.

The dnsmasq program will start and use the dnsmasq.conf file we created in Part 1. Notice the DHCP lease range and the name servers.
Step 6: Turn up the Strength
If your adapter supports it, you can increase the power of your fake AP or evil twin by changing the signal strength of your wireless adapter using the iwconfig wlan0mon txpower {NmW|NdBm|off|auto} command. So, for example, you could execute the command, iwconfig wlan0mon txpower 27. This turns up the power to 27 dBm or 500 milliwatts; any higher is illegal in the U.S.
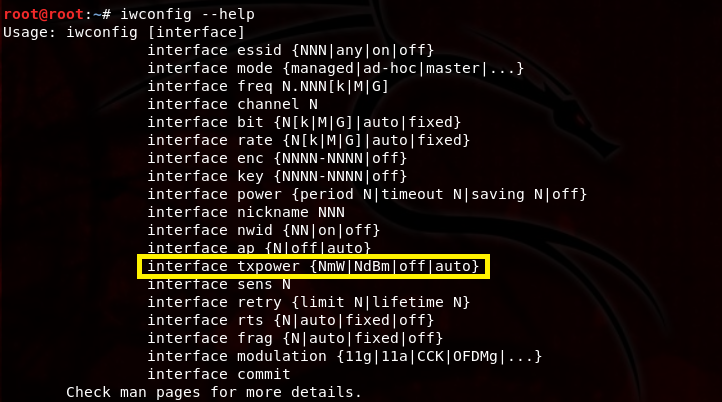
This might be helpful to over come the signal strength of the legitimate AP. Now that our power is turned up, we can proceed to the second-to-last step.
Step 7: Kick Wireless Clients Off the Legitimate AP
One of the final steps here is to kick wireless clients off my legitimate AP, in my case, that’s the real HOME-5432 network. We can do this by using aireplay-ng. By executing the aireplay-ng –deauth 50 -a [BSSID of real AP] wlan0mon, we can send 50 802.11 deauthentication frames onto the HOME-5432 network.
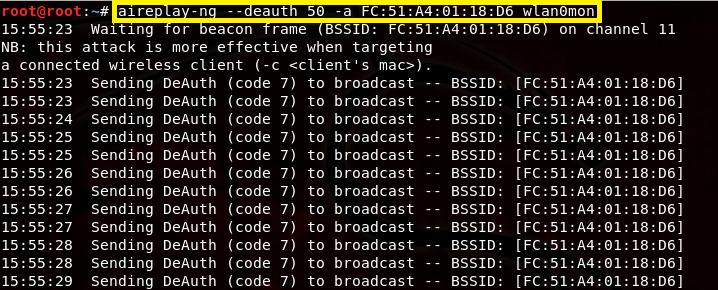
This kicks wireless clients off my network in hopes that they will associate to my evil twin instead. You can also change the number of deauth frames you would like to send. I just chose 50 because it seems like enough.
Step 8: Wait for a Connection
If there are no clients associated to the legitimate AP, you’ll just have to wait until a client appears. That’s why it’s a good idea to choose a network that already has clients connected to it.

As we can see in the output below, a client (it’s my iPhone) has associated to my evil twin. This information is found in the airebase-ng terminal window that we left open.

We can also see the DHCP information in the dnsmasq terminal window. By reviewing the output in the following screenshot, we can see this client has made a DHCP broadcast request for IP address 10.0.0.246. 
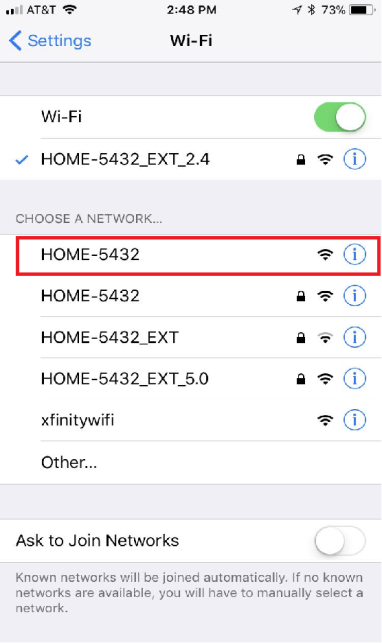
I can verify that my iPhone has connected to this evil twin by opening my Wi-Fi settings. The screen shot here shows that my iPhone automatically connected to the evil twin.

And, if we look a little further, we can see that our DHCP server assigned my iPhone the 10.0.0.249 address…hmmm, that’s not 10.0.0.246. So, what happened?

Well, it’s a good thing we decided to log DHCP information, because now I can look back and find out what happened.

Judging by the output above, it appears our DHCP server offered my iPhone the IP address 10.0.0.249 and other network settings. It accepted this offer and DHCP acknowledged these settings soon after. To verify that the Internet is actually working while connected to this evil twin, I used my iPhone to make some quick Google searches and began surfing Facebook.

Surprisingly, the Internet was pretty fast. And since we’re logging query information, I can see all the DNS requests that I am making from my iPhone in the dnsmasq terminal window.

Finished
Congratulations, you’ve learned how to create a fake AP and an evil twin using Aircrack-ng and dnsmasq.
Since all the victim’s traffic is going through the attacker’s machine, he or she can capture a lot of sensitive information since it’s technically a Man-in-the-Middle (MitM) attack. The attacker can theoretically even use sslstrip to decrypt all https traffic and gain access to bank account credentials, email credentials, and social media credentials. However, that might not be the case today since sslstrip kind of seems useless on modern browsers. The point is that whatever the victim submits is now in the hands of the attacker.
As I mentioned in Part 1, an attacker can even perform various redirection attacks. It’s not uncommon for hackers to redirect their victims to a cloned Facebook login page. Once the victim tries to login, the hacker harvests the credentials. This attack can be very easily accomplished using Ghost Phisher or Apache2.
Protection Against Evil Twins
Be wary about connecting to open WiFi. If you see two identical network names, such as “Starbucks WiFi” and “Starbucks WiFi,” then perhaps you should avoid connecting to either one of those networks. If you’re on a smart phone, then now is a great time to use the cellular network instead or a VPN service.

If you are already connected to open WiFi, you should think twice about submitting any sensitive information. Also, keep an eye on the URL bar. If the “s” in https should ever vanish for some reason, you could be a victim of sslstrip. Your information is being decrypted and viewed by a nearby hacker. Just watching the URL bar in general is a good indication of whether you’re in danger or not. If you see an IP address in the URL bar, for example, that’s not very common.

[…] Now that Aircrack-ng is updated and we’ve configured our new dnsmasq.conf file in /Desktop/eviltwin/, we can now commence the attack. If you’re ready to move on, click here to move on to PenTest Edition: Creating an Evil Twin or Fake Access Point Using Aircrack-ng and Dnsmasq [Part 2 &#…. […]
LikeLike
[…] promised in Creating an Evil Twin or Fake Access Point Using Aircrack-ng and Dnsmasq [Part 2 – the Attack], here is another way we can create an evil […]
LikeLike