
Introduction
A man-in-the-middle attack occurs when an attacker sits in the middle of the communication between two victim devices, secretly relaying information back and forth on their behalf, similar to a proxy. It can be thought of as active eavesdropping. The attacker cannot only see the communication traveling to-and-from the victim devices, but can also inject his own malicious traffic. With this attack, the hacker possesses the ability to capture personal identifiable information, login credentials, decrypt information, and so on. Furthermore, the man-in-the-middle attack is often the initiator for more dangerous attacks.
Pentesters may not always be authorized to perform this type of attack because it may overreach the scope of the assessment and has obvious issues regarding privacy concerns. In this demonstration, I’ll be sitting in between a target device and the router/gateway on a private network using Cain & Abel. This will allow me to see the target’s Web traffic.
Disclaimer:
Conducting MitM attacks are illegal unless you have permission from the owner of the network and the parties involved. This post should be used as a tool to help the audience understand how Cain & Abel (though intended as a security tool) is used by hackers. It will also detail how we can view the traffic of the target using Wireshark without monitor mode.
Prerequisites
A Man-in-the-Middle (MitM) attack puts your machine in between two victims. In other words, you can sit in between two hosts on your local network. For example, common MitM attacks will sit between a host and the gateway that sits between the network and the Internet. We can create a MitM attack by “ARP Poisoning.” Address Resolution Protocol (ARP) is a layer 3 network protocol used by computers to resolve MAC addresses to IP addresses. The tools you will need are shown below. They are both opensource, so they are free to download at the links provided:
- Wireshark: https://www.wireshark.org/
- Cain & Abel: http://www.oxid.it/
If you want to skip the educational lessons on these tools and go straight to how we conduct a MitM attack on a wireless network without monitor mode, skip to the “Conducting a MitM Attack (Part 1)” section.
A Problem with Wireshark and Windows
Wireshark uses either “libpcap” or “WinPcap” to capture packets that traverse the network, which can be on a wired or wireless LAN.
“Libpcap” is used to capture live network data. As capture filter strings are directly passed from Wireshark to libpcap, the available capture filter syntax depends on the libpcap version installed. “lib” stands for “library; “p” stands for “promiscuous” or “packet;” and “cap” stands for “capture.” Together, “libpcap” stands for “promiscuous library capture.” Packet capture consists of an application programming interface (API) for capturing network traffic. Libpcap provides implementation-independent access to the underlying packet capture facility provided by the operating system. So pretty much, libpcap is the library we are going to use to grab packets right as they come off of the network interface card (NIC)… or adapter, whatever you wish to call it. Only UNIX/Linux platforms come with libpcap
“WinPcap”stands for “Windows Packet Capture.” You guessed it, Windows does not come with libpcap, so it uses WinPcap. If your Windows OS does not come with WinPcap, it is available for download at https://www.winpcap.org/. When downloading Wireshark, the installation process will probably prompt you to download WinPcap anyway. Wireshark uses this library to capture data packets on Windows machines. WinPcap uses NetGroup Packet Filter (NPF) to process packets and capture them. NPF is built into your NIC at the kernel level.
Note: I use NIC and network adapter interchangeably. They are both the same thing.
You might be wondering how does Wireshark capture these packets? Normally, a computer only looks at packets addressed to itself only and ignores the rest of the traffic on the network (bleh…not very cool, right?). But, when a packet sniffer is set up on a computer, the sniffer’s network interface is set to promiscuous mode. This means that it is looking at everything that comes through. The amount of traffic largely depends on the location of the computer in the network.
Most NIC hardware has a promiscuous mode, where it will intentionally accept all packets that it sees and pass them up to Wireshark. This is the key. If you are running Wireshark in promiscuous mode on an Ethernet card, you may wonder why you are still not seeing packets of other PCs talking to the Internet. The reason for this is that PCs are connected to network devices called “switches.” These layer 2 devices are “managed,” meaning they are intelligent and often come with a console for network administrators to configure. Switches act like a telephone switchboard operated by persons connecting calls: if a packet enters the switch, it will be transported only to the destination port, while all other ports will never see the packet (including a packet capture device wondering what’s going on). This is very different from a hub, for example, that forwards or floods unicast traffic to every port.
You should already have more than a basic understanding of networking, routing, and switching to understand this tutorial. As I just said, these switches do something that make it almost impossible to have packets on one cable go to your network Ethernet card…they forward unicast packets ONLY to the physical port where the destination is. It goes from source port to destination port. The capture will never see any of this, and you will need to enable port mirroring to change this. Luckily, we are focusing on wireless networks only in this tutorial, so we do not have to worry about this.
If you are using a MS Windows OS, there’s a small problem when using Wireshark. Wireshark is a protocol analyzer, or a “sniffer” for short. All it does is display the packets traversing the wired or wireless network you are connected too. It displays these packets in a helpful format for network administrators.
The problem that I am referring to when using Wireshark on a Windows platform is that your built-in wireless network adapter probably will not support “monitor mode” on Wireshark. You need a special type of wireless adapter for Wireshark’s cool features, like monitor mode. If you’re trying to capture network traffic that’s NOT being sent to or from your machine running Wireshark (this is what we’re trying to do), traffic between two or more other machines on an Ethernet segment, interested in 802.11 management/control packets, or are interested in radio-layer information about packets, you will probably have to capture in Wireshark’s “monitor mode“. This is discussed below. Without monitor mode, capturing on Wireless LAN’s, or any wireless network for that matter, may capture only “user data” packets with “fake” Ethernet headers. In this case, you won’t see any 802.11 management or control packets at all. You would think 802.11 packets would show up, but they will not without monitor mode. Instead, the 802.11 packet headers are “translated” by the network driver to “fake” Ethernet packet headers. That’s confusing and annoying as hell, I know. You can be on a WLAN, but you are getting Ethernet headers as the layer 2 protocol…it’s just weird and confusing.
802.11 traffic includes data packets that are the packets used for normal network protocols; it also includes management packets and low-level control packets. The 802.11 (wireless) hardware on your network adapter filters all packets received, and delivers to the host:
- Without monitor mode, you will receive all unicast packets intended for your wireless interface adapter/card. This means you will see all sending/receiving traffic to your machine only.
- Without monitor mode, you will see all multicast packets that are being sent to your wireless interface adapter/card (only if your machine is one of the intended multicast addresses). Actually, some network adapters accept it regardless
- Without monitor mode, you will see all broadcast packets, such as Ethernet broadcast frames (ARP requests/gratuitous ARPs). <— and this makes ARP exploitable using ARP poisoning (discussed later)
The driver for the adapter will also send copies of transmitted packets to the packet capture mechanism, so that they will be seen by a capture program as well. Recall that a driver is a link between software and hardware. Also, recall that a driver provides a software interface (API) to hardware devices, enabling operating systems and other computer programs to access hardware functions without needing to know precise details of the hardware being used.
As I said, in order to capture 802.11 traffic other than unicast traffic to and from the host on which you’re running Wireshark, multicast traffic, and broadcast traffic, the adapter will have to be put into monitor mode. Promiscuous mode is, in theory, possible on many 802.11 adapters, but often does not work in practice; if you specify promiscuous mode, the attempt to enable promiscuous mode may fail, the adapter might only capture traffic to and from your machine, or the adapter might not capture any packets. The problem with promiscuous mode too is that you have to associate with your wireless AP, which means you are sending out packets and interacting with the network. In monitor mode, you are completely passive…just strictly monitoring. In addition, when not in monitor mode, the adapter might supply packets with fake Ethernet headers (as I said earlier), rather than 802.11 headers, and might not supply additional radio-layer information, such as data rates and signal strength. You may have to perform operating-system-dependent and adapter-type-dependent operations to enable monitor mode; information on how to do this can be found on the Wireshark User’s Guide.
Again, 802.11/wireless network adapters often transform 802.11 data packets into fake Ethernet packets before supplying them to the host, and, even if they don’t, the drivers for the adapters often do so before supplying the packets to the operating system’s networking stack and packet capture mechanism. This means that if you capture on an 802.11 network, the packets will look like Ethernet packets, and you won’t be able to see all the fields in the 802.11 header. On some platforms, you can request that 802.11 headers be supplied when capturing, at least with some 802.11 adapters, regardless of whether you capture in monitor mode, sometimes called “rfmon mode;” on some other platforms, you will get 802.11 headers in monitor mode, and only in monitor mode.
So, it appears Wireshark is pretty useless without monitor mode. What’s the point of capturing only the unicast (and few multicast/broadcast) traffic only intended for your computer? This is where Cain & Abel comes in.
Cain & Abel
Cain & Abel has a suite of cool features, such as password cracking tools for brute force and dictionary attacks. However, we are interested in its ability to conduct ARP Poisoning attacks.
ARP Poisoning involves sending spoofed gratuitous ARPs to a host victim(s) on the network. This spoofed ARP can facilitate a Man in the Middle (MitM) attack. You should already be familiar with ARP and how it works, but there is an illustration of how this works below. Basically, you are manipulating the victims’ ARP tables. Once in the middle, you can use Wireshark to intercept packets between two hosts or even a host and a router/modem/gateway.
An ARP Poisoning attack looks like this:
Step 1:

Step 2:
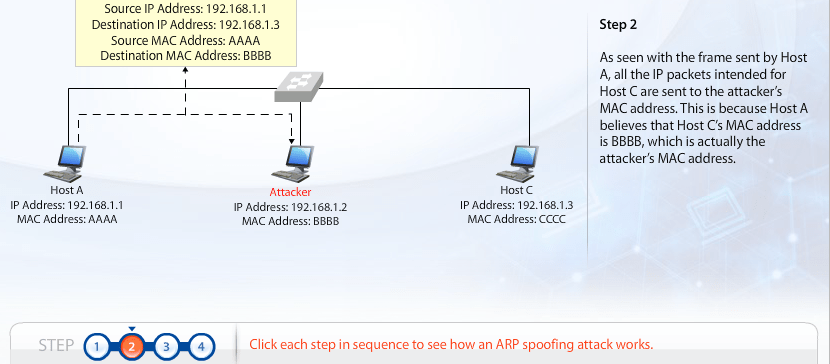
Step 3:
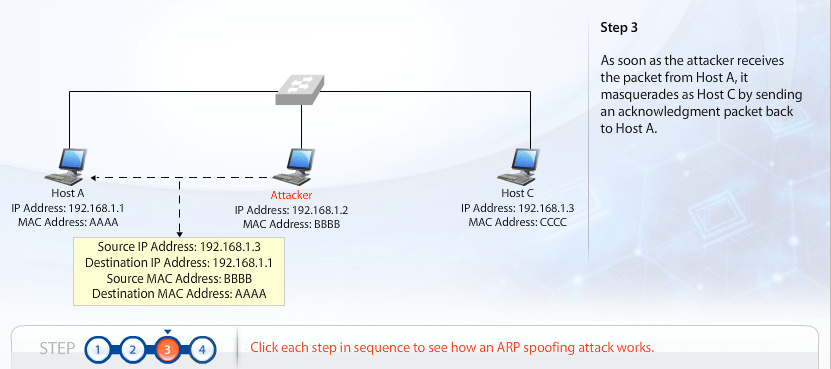
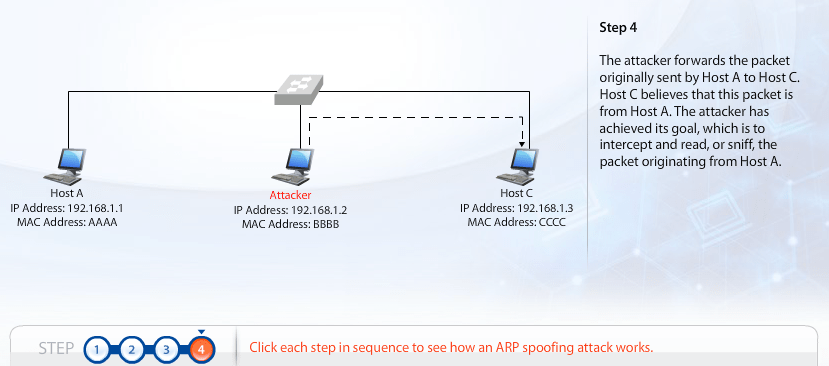
Step 4:
Conducting a MitM Attack (Part 1)
I have a laptop running MS Windows 10 Home edition. What we are going to do is produce a MitM attack on my home network by sitting in between my desktop computer and my gateway. This will allow me to capture all the unicast traffic of my desktop and my gateway, to the Internet.
The first thing we are going to do is open up Wireshark and begin capturing traffic. The home screen on Wireshark will display a list of capture interfaces, but go to Capture on the menu bar and then click “Options…“on the dropdown list. The list you see are the network adapters you have installed on your computer. They can be wired or wireless. Which one do you choose? You are going to choose your wireless network adapter, which usually goes by the name “Wi-Fi.” You can tell which interfaces are active because Wireshark displays a real-time line graph of each adapter’s network activity. Once you’ve selected your adapter, click the “enable promiscuous mode on all interfaces” box and then click Start.

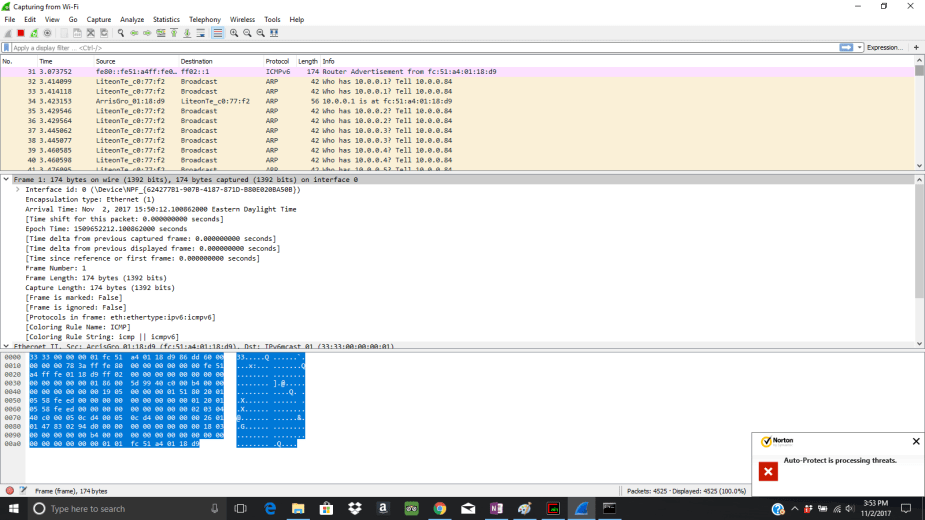
Right away, you will begin capturing mostly the unicast traffic going to and from your wireless network adapter. You might see some multicast or broadcast traffic here and there. The unicast traffic is only intended for your device. The IP address of my laptop is 10.0.0.84, so you’ll see that I’m mainly capturing traffic to and from my laptop (unless there is any multicast or broadcast traffic from other devices on my home network).
If you’ll notice below, see how Wireshark is converting the 802.11 packets into Ethernet frames on the wire? Without monitor mode, not only can we not capture other devices’ unicast traffic, but we cannot see the 802.11 packets as highlighted in the “A Problem with Wireshark” section. So, we have to fix this.

Conducting the MitM Attack (Part 2)
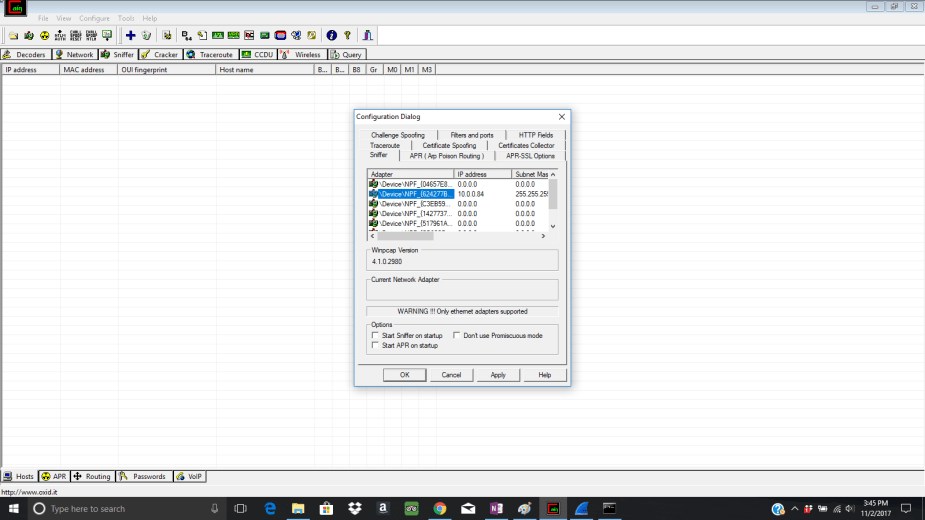
Open up Cain & Abel and click the Sniffer tab on the menu bar. Click the Start/Stop Sniffer icon on the menu bar and the Configuration Dialog box will display with a list of all the available network adapters on your machine. I’m going to pick the wireless network adapter displaying my IP address 10.0.0.84 with the subnet mask 255.255.255.0.
Click OK and then click the “+” sign at the top on the menu bar. This will bring up the MAC Address Scanner box. Check the All tests box and then click OK. Cain & Abel will now scan for MAC addresses on the home network. All home networks are going to have class C networks, so that means there will only be 254 available host addresses. It will send Gratuitous ARPs to all 254 addresses between 10.0.0.1 through 10.0.0.254. It basically asks every host who has which IP address and to respond and tell 10.0.0.84 (me). For example, it will ask “Who has IP address 10.0.0.8? Tell 10.0.0.84.” If you open up Wireshark again, you’ll see all these gratuitous ARPs being captured:
This displays the scanning performed by Cain & Abel. The network address 10.0.0.0 and the broadcast address 10.0.0.255 are excluded since they are not reserved for hosts.
Now, if you go back to Cain & Abel, you’ll see all the available hosts on my network. In my case, I have 4 devices that are currently active on my network. I’ve highlighted the desktop IP address I want to attack:
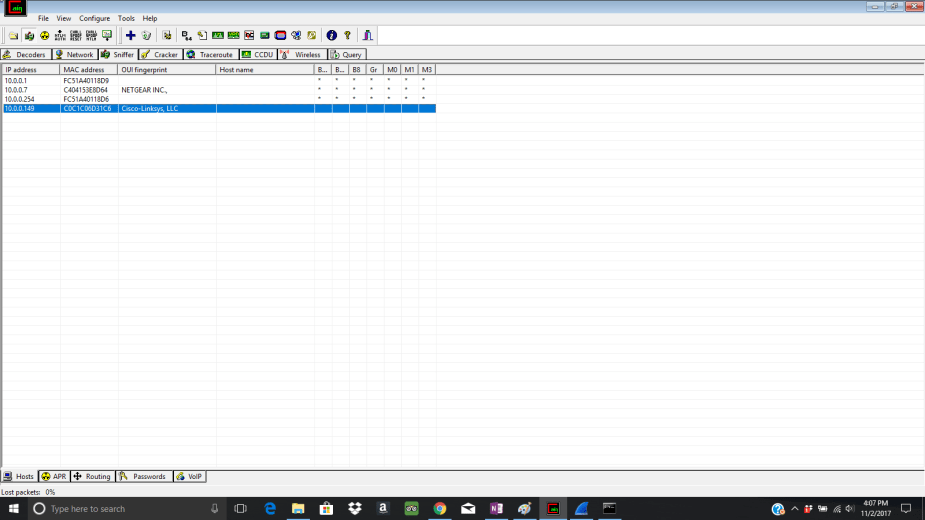
- 10.0.0.1 = My Gateway. All gateways will have the default IP address 10.0.0.1 or 192.168.1.1.
- 10.0.0.7 = My Netgear Wi-Fi Extender
- 10.0.0.249 = My iPhone
- 10.0.0.149 = My Desktop computer
- 10.0.0.84 = Me (But, it does not display)
-
- Notice how I was not capturing any of the traffic coming from any of these devices on Wireshark. This is because my network adapter is not compatible with monitor mode.
- These are private IP addresses and cannot be accessed from the Internet. So, revealing them to you is harmless.
Now, we are going to ARP poison the desktop computer. But first, just for simplicity and to help you understand what’s going on behind the scenes, I’m going to cheat and log on to my desktop computer right now and open up the ARP table by typing arp –a in the desktop’s command prompt. Its ARP table states that:
- IP address 10.0.0.1 (Gateway) has the MAC address fc-51-a4-01-10-d9
This just tells the desktop the correct IP-MAC address pair.
Now, go back to Cain & Abel and click the APR tab at the bottom. Click anywhere in the first, empty pane. This should highlight the “+” sign on the menu bar; click it. The New ARP Poisoning Routing box will pop up and, to initiate the ARP poisoning, I will click 10.0.0.149 (desktop) on the left and then click 10.0.0.1 (gateway) on the right. Click OK. This will allow me to send a Gratuitous ARP to 10.0.0.149 (desktop), which informs it that the new IP-MAC address pair for 10.0.0.1 and fc-51-a4-01-10-d9 (desktop) is now 10.0.0.84 and 30-52-CB-C0-77-F2 (which is me, or my laptop)! Thus, any of the desktop’s traffic intended for the gateway and to be routed out onto the Internet will go to my laptop’s network adapter and display it on Wireshark.

After clicking OK, the ARP poisoning session will show up in the top pane and have an “idle” status. You need to click the Start/Stop APR or “Poison” icon (the nuclear symbol) in the menu bar to change the status to “poisoning.”

Again, to help you better understand, If I go back to my desktop computer and open the ARP table again with arp -a, it reveals that the ARP poisoning was a success and the IP-MAC address pair for the gateway was changed. As you remember, the old ARP table entry stated that:
- IP address 10.0.0.1 (Gateway) has the MAC address fc-51-a4-01-10-d9…but now, it has changed to:
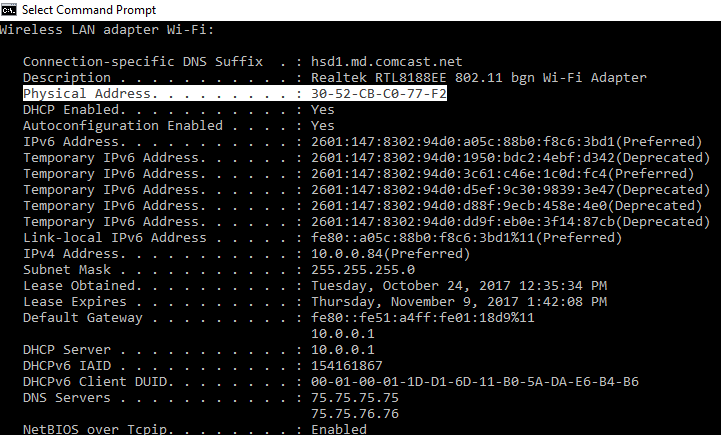
- IP address 10.0.0.1 (Gateway) has the MAC address 30-52-CB-C0-77-F2…This MAC address is the physical address of my network adapter for my laptop! My desktop has been fooled.
Thus, when the desktop wants to connect to a Web server on the Internet through the gateway, it will mistake my laptop as the gateway itself and direct its traffic to me instead. My laptop, however, will forward the traffic to the gateway on the desktop’s behalf and any traffic coming back to the desktop from the Internet/gateway will also go through my laptop and be forwarded to the desktop. This goes on seamlessly behind the scenes, thus tricking the victim into thinking its really communicating with the gateway. The end-user behind the desktop will never know that I am intercepting all their traffic. I am now sitting in between the desktop and the gateway in my home network and the MITM attack is a success.
As you can see, the MAC address of my laptop is:
Conducting the MitM Attack (Part 3)
Now, let’s put this all together. Assuming the end-user behind the desktop is surfing the Web, we can now capture the unicast traffic of the desktop on my laptop by using Wireshark (originally, we were not able to see any other devices’ traffic because I cannot use monitor mode). However, with Cain & Abel’s ARP poisoning capabilities, I can now intercept and capture all the traffic to-and-from the desktop computer.
Since I don’t have someone on my desktop right now, I am going to go onto my desktop and start surfing the Web. I am going to go to http://www.lamebook.com and hopefully, we can capture this traffic on Wireshark on my laptop.
Open Wireshark again. In the “apply a display filter” dialog box on the menu bar in Wireshark, type ip.addr == 10.0.0.149 && http. This filter will “filter” out HTTP traffic from 10.0.0.149 only, which is going to-and-from the desktop computer.
And Voila, I am now able to capture the unicast Web traffic coming to and from the desktop. No monitor mode required. Check out what this looks like below:
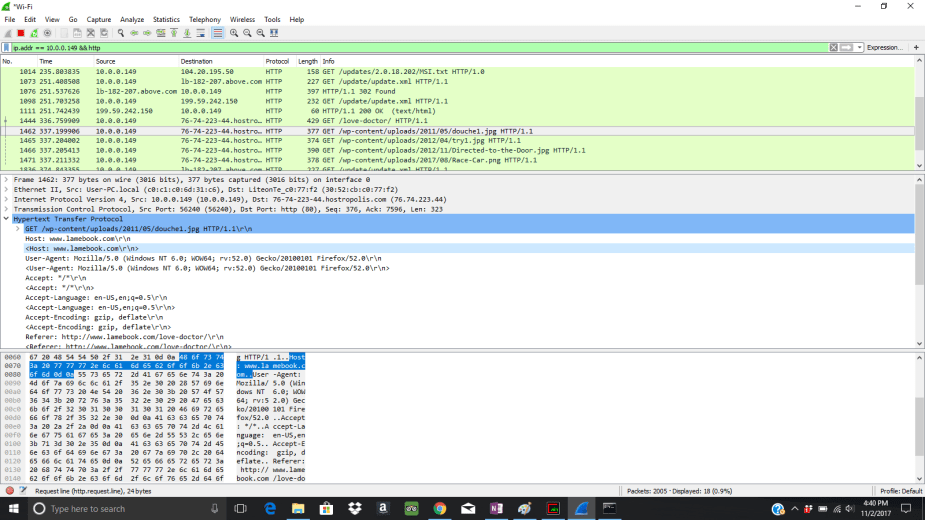
As you can tell in the highlighted areas, I was able to see that the desktop was navigating through http://www.lamebook.com and viewing a post called “love-doctor” on this web site. So, we previously went from not being able to capture any network traffic besides my own…to capturing another host’s network traffic
What Can You Do With This Type of Attack?
With a MITM attack using ARP poisoning, you will be able to see all the traffic between the victim and the gateway (I guess you can call the gateway a victim as well). The best part is you do not need monitor mode to do this! But if you want to perform packet injection, you will need monitor mode.
With this attack, an attacker can see all the web sites the victim is navigating to (unless they are encrypted with HTTPS). But, not all Web sites are utilizing SSL/TLS encryption, thus any web sites that are unencrypted will reveal usernames, passwords, and cookie information. With this information, attackers can steal their credentials and logon with them. Or, you can also steal cookies and perform session hijacking attacks.
You can use this attack on open wireless network hotspots that do not require a password to authenticate. Many Coffee shops, shopping centers, and the like, love to give their customers easy-access to their Wi-Fi. Sit in a coffee shop and perform this type of attack (assuming the AP is not in isolation mode).
Note: Performing this type of attack on a network that is not yours is ILLEGAL
