
A “switch” is a Layer 2 (Data Link) device that largely replaced hubs in the early days of networking. These days, it’s hard to imagine any network tech installing a hub over a switch. The greatest benefit of a switch over a hub is that is has “intelligence,” well, managed switches do, at least.
Managed Switches vs. Un-managed Switches

Today’s switches are “managed,” meaning network administrators now have better control over their network and the traffic moving through it. These devices have the ability to “learn,” which I’ll get into in a moment. On top of that, they are SNMP-capable, allowing network administrators to view a number of different diagnostic details about the switch from over the network. Overall, the features of a managed switch vary from manufacturer from manufacture, but most managed switches are going to offer Quality of Service (QoS) support, full-duplex, port mirroring, Spanning Tree protocl (STP), VLAN technology, VTP, interVLAN routing, terminal emulation program support, and Web-interface support. Sounds like a lot of cool features, some of which I’ll get into on another post.
Un-managed switches are the “dumber” switches. They aren’t capable of the features described above, but they are capable of running in either half- or full-duplex. I’m not sure how common un-managed switches are on modern networks. But, I’m willing to bet they’re not really used anymore.
How the Switch Works
Switches have taken the place of hubs. Therefore, switches connect computers, printers, and other devices together onto a local network or broadcast domain. The devices that are connected to the switch are typically called “hosts.” All the hosts that are connected to the same switch usually have the ability to communicate with the other hosts connected to the switch. For example, on a small corporate floor, the workstation computers are usually all connecting via Ethernet to a central switch in a telecommunications room. Since they are all connected to the same switch, they do have the ability to share files with each other.
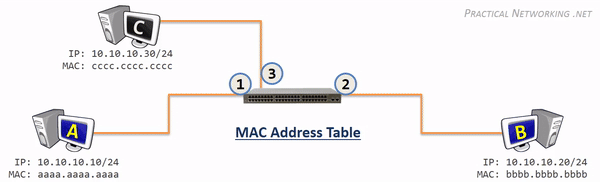
What really separates the switch from the hub is its ability to “learn” the devices connected to it in order to enable unicast traffic (one-to-one). As you saw from my last post, hubs forward a copy of a host’s traffic to every other host connected to it, which is one-to-many traffic (that’s not good from a security standpoint). Switches, on the other hand, contain something called a “Content Addressable Memory (CAM) table.” The CAM table is a helpful table that stores the MAC address of each host connected to the switch including the physical port the host is connected to.

For this reason, CAM tables are often called “MAC address tables.” However, when a network tech first installs a switch onto a network, the MAC address table is empty. The switch must therefore “learn” the MAC addresses of all the hosts connected to it. A switch learns the MAC addresses of the hosts connected to it via a feature called “unicast flooding.”
Unicast traffic means one-to-one traffic. When a switch first boots up, the MAC address table is empty. So, when a host submits a unicast packet to another host connected to the switch, it treats this packet as a broadcast packet and sends a copy of the unicast packet to every other host connected to the switch (just like a hub does). The switch observes which host responds. As an example, look at the diagram above once more. Assume that the MAC address table is empty. If AA-AA-AA-AA-AA-AA sent a packet to DD-DD-DD-DD-DD-DD, the switch would send a copy of that packet to EVERY host, but only DD-DD-DD-DD-DD-DD would process the packet. Due to this unicast flooding, the switch now knows the MAC address of the hosts connected to port 1 and 4 and, as a result, can now update the MAC address table. The switch will continue unicast flooding until it learns every MAC address of each host connected to it. This only takes a little bit of time to do. Once the MAC address table is full, the switch performs one-to-one, unicast traffic. Below is a better visual of how unicast flooding works, courtesy of PracticalNetworking.net.
Switch Features
Managed switches have a lot of nifty features that make them easily manageable, advanced, and securer than their prior networking counterparts. Let’s discuss a few of these features. I won’t be getting into the specifics about how each one works in this post, but I will take time to make a post on each one separately in the future.
Port Mirroring
Port mirroring goes by “Switch Port ANalyzer (SPAN)” in the Cisco community. Port mirroring is meant as a troubleshooting tool and it allows network administrators to assign a physical port on the switch as a “mirror” port. When a physical port is set to mirror, a copy of all the traffic going to and from that physical port will be copied and sent to an assigned “monitor” port, which is where the network administrator’s computer will be connected to. The network administrator can then use a protocol analyzer to examine the traffic going to and from that mirror port.
Switch Loop Protection
In large networks with a lot of switches, mistakes can be made. Sometimes, network techs might accidentally setup a switching loop due to cable misconfigurations. This causes a broadcast storm, which can degrade network performance or shut down the switch entirely. IEEE has a standard called 802.1D, otherwise known as “Spanning Tree Protocol (STP),” and this protocol can fix switching loops on-the-fly! There’s a newer version of STP called “Rapid STP (RSTP),” and it can correct switching loops much quicker than STP.
Wireless capabilities
Today’s networks are becoming increasingly wireless. Switches can also be wireless, connecting wired-to-wireless LANs or wireless-to-wireless LANs.
VLAN capabilities
Switches today can create “virtual Local Area Networks (VLANs).” It’s rare to see any serious network not using VLANs. With a VLAN, a network administrator assigns ports to a specific VLAN. Traditionally, one switch is a single broadcast domain, but with VLANs, we’re chopping the switch into multiple broadcast domains. So, essentially, we’re creating several switches within one switch! This saves a lot of money buying extra switches and it’s easy to group organizational groups into VLANs, as you see in the diagram depicted below. On each switch are 3 VLANs. These VLANs are separated just like a physical LAN. PC1 in the Finance VLAN on Switch A on the first floor can communicate with PC4 in the Finance VLAN on Switch B on the second floor. VLAN traffic can travel from VLAN-to-VLAN via “trunking.” The cable connecting Switch A and B below is called a “trunk.” Or you can use a router. If you want to understand VLAN concepts more in-depth, I highly recommend this video.

Automatic Configuration
It’s inevitable that you’ll have to change your network layout and infrastructure as your network grows. This might require adding or removing certain VLANs. Unfortunately, this also means you’ll have to access each switch individually and update the VLAN assignments manually. Or does it? “VLAN Trunking Protocol (VTP)” enables the automatic updating of VLAN switches. Just configure one of your switches as the “server” switch and the rest as “client” switches. Network administrators make VLAN changes on the server switch, and the updates are all sent to the client switches that are connected via trunking.
Routing
Yes! Switches can have built-in routing capabilities too! (I know, this goes against what I said at the top how switches are layer 2 devices). But, these switches can route between VLANs.
Simple Management
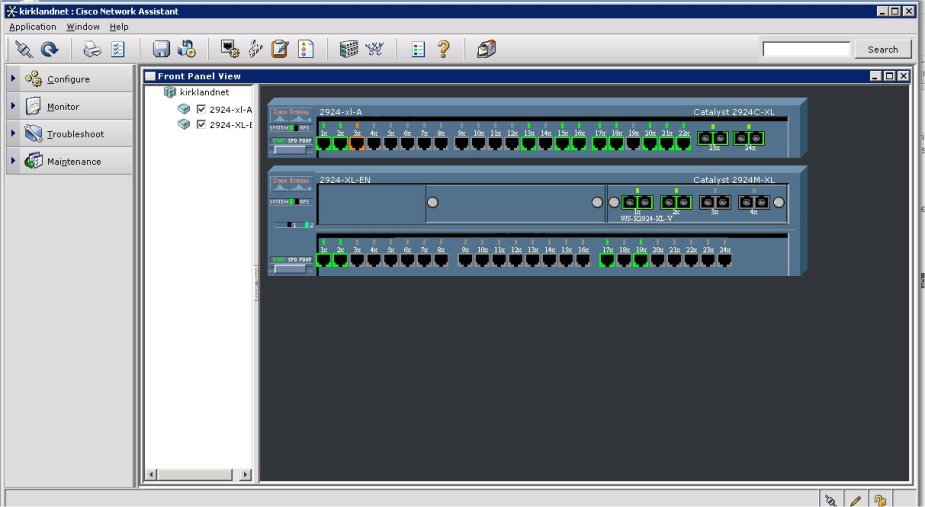
Many manufacturers of switches, like Cisco, provide “Network Management Software (NMS)” for their switches. These proprietary tools give network administrators a better overall view of their network and easy-to-do configuration options. Some examples include, Cisco’s Network Assistant, Cisco Configuration Professional, and Cisco Prime Infrastructure.
Console Setup
Managed switches allow you to connect to them directly via a yost cable and a terminal emulation program, such as “PuTTY.” The terminal you use to communicate with a switch is a little more user-friendly. In addition, you can connect to the switch remotely across the network. In order to do this, the switch must have an IP address. Just open up a web browser and enter the IP address of the switch and, voila, you are connected to the switch’s web interface once you authenticate.
802.1x
802.1x is also known as “Port-based Network Access Control (PNAC) and I covered it in a prior post. 802.1x is complicated to set up, but restricts access to the network. It specifically stops unauthorized users from plugging their computers into an Ethernet port and gaining access to the network. They must first authenticate if they want to be allowed access.
What Do You Think?
There are a lot of other cool things about switches. But, I hope I’ve helped you understand some of the basic points so far. I’ll be getting more into each one of these features in the future.
References
Meyers, M. (2015). All in One CompTIA Network+ Certification Exam N10-006. McGraw-Hill Education: New York, NY.

[…] features that make these devices simple to manage, but perhaps, more difficult to configure. In my last post about switches, I mentioned I’d go into a little more detail about the features that […]
LikeLiked by 1 person