Modern switches have a lot of cool, useful features that make these devices simple to manage, but perhaps, more difficult to configure. In my last post about switches, I mentioned I’d go into a little more detail about the features that switches have to offer. One of the first features I mentioned was “port mirroring.”
Port Mirroring: What’s It Good For?
If you recall from my last post, a switch doesn’t broadcast copies of a host’s traffic to the other host’s connected to that same switch (with the exception of unicast flooding). This was one of the design flaws about hubs that made them ultimately big security risks. Therefore, if you want to get access to a connected device’s traffic going in and out of the switch, you’ll have to use a hub…unless you enable port mirroring.
Most network techs are using port mirroring on a switch for troubleshooting reasons. For instance, they might want to observe traffic on the network, examine security problems, or debug protocol implementations. Other people use it for nefarious reconnaissance.
Connecting to the Switch
Port mirroring, from a Cisco standpoint, is called Switch “Port ANalyzer (SPAN).” To configure port mirroring on your switch, you’ll need to securely access your switch. If it’s an unmanaged switch, you’re out of luck. But, if it’s a managed switch, there are a few ways to go about doing this. Connect your laptop to any open physical Ethernet port on your switch. If your switch has an IP address and is connected to the local network, you can authenticate to the switch with a terminal emulator like PuTTY. However, this discussion focuses on the next option, which can only be accomplished if the switch has a Web interface that you can log into. That means it also needs an IP address. Just open up your Web browser, type the IP address of the switch in the URL bar, and then login to the switch. If the connection isn’t secure, you’ll need to use an encryption tunneling protocol. If you don’t know the login credentials of your switch, check the documentation. All network devices come with a default username and password. You can also check to see if your switch’s manufacturer has any proprietary software that helps configure the switch. These tools typically have a GUI, making it very end-user friendly. You can see some of the different kinds of consoles below. As you can see, some are web consoles and some are switch manufacturer software.
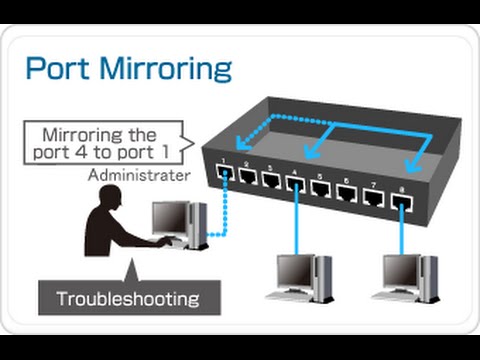
Enable Port Mirroring
As I just stated a moment ago, switches send unicast (one-to-one) traffic, meaning the switch is only going to send traffic to its intended destination port on the switch (and not flood every port, like a hub). Therefore, the usual functioning of a switch kind of looks like the visual display below. As we can see, the packet capture device connected to the switch cannot view the traffic going to and from the client and Server 1 because switches don’t broadcast traffic to each port (again, with the exception of uni-cast flooding).
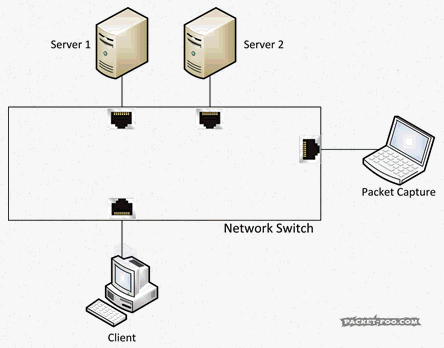
Switch without SPAN enabled. Reprinted from “The Network Capture Playbook 4 – SPAN Port in-Depth,” by Jasper, 2016, retrieved from Packet-Foo
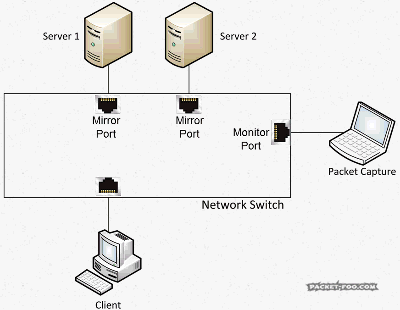
Using whichever method you chose to connect to the switch, you need to assign a source port (also called a “mirror” port) and a destination port (also called a “monitor” port). If, for example, you choose the physical port connected to Server 1 as the source port, and the port you’re currently connected to as the destination port, the switch will send a copy of all the ingress-egress traffic from the source port to the destination port. In other words, the switch is mirroring the information coming in-and-out of the mirror port to the destination port for you to monitor and analyze.

Switch with SPAN enabled. Reprinted from “The Network Capture Playbook 4 – SPAN Port in-Depth,” by Jasper, 2016, retrieved from Packet-Foo
If you have a NIC or network adapter capable of packet capture, you can open Wireshark and see a copy of the traffic from Server 1 being processed by your NIC. From there, you can analyze the traffic and perform any necessary troubleshooting.
One cool thing about port mirroring is that you can do it remotely, even over a router! However, this is often not recommended because it can slow down your network. If you’re interested, the two types of remote port mirroring are “Remote SPAN (RSPAN)” and “Encapsulated Remote SPAN (ERSPAN).”
Things to Consider When Enabling Port Mirroring
Monitor ports are only going to transmit captured packets to your NIC/capture device. It will not accept any packets coming from the computer connected to it. Because of this feature, once you are connected to a monitor port, you will not be able to communicate with the other hosts connected to the switch or connect to the router.
The second issue with port mirroring is that you can potentially create a bottleneck at the monitor port. If you have a 1Gbps full-duplex mirror port, then 1Gbps of transmit traffic and 1Gbps of receive traffic is flowing to the monitor port. The monitor port can only transmit 1Gbps of information to your NIC, which creates a bottleneck. As a result, you might be getting dropped packets here-and-there.
A Bottleneck at the Monitor Port. Reprinted from “The Network Capture Playbook 4 – SPAN Port in-Depth,” by Jasper, 2016, retrieved from Packet-Foo
Port mirroring can also stress the switch’s CPU. Keep in mind that the CPU will be managing the port mirroring session and the more source ports you add during the session, the more load you’re putting on the CPU.
References:
Jasper. (2016) The Network Capture Playbook 4 – SPAN Port In-Depth.” Retrieved from https://blog.packet-foo.com/2016/11/the-network-capture-playbook-part-4-span-port-in-depth/
