
Nmap, or “Network Mapper,” is a network discovery, analysis, and auditing tool utilized by both network defenders and network attackers. As an exceedingly flexible tool with dozens of methods for mapping out networks, Nmap has become a critically acclaimed and well-supported cyber tool. Using Nmap, we can perform network sweeps to discover available hosts on the network, effectively “mapping” the network topology. This would be great for auditing purposes, but also valuable information to a penetration tester or a hacker.
Nmap is also a port scanner, which allows network administrators to identify open ports and running services on their network or individual critical systems. This makes Nmap a great tool to identify unwanted open ports/services that could be discovered and possibly exploited by a hacker. Another particularly useful feature is Nmap’s Operating System (OS) fingerprinting capabilities. When instructed to do so, Nmap can query a target system and identify the operating system and its version. As an added benefit, Nmap can even identify filtered and unfiltered ports, which indicates the use of packet filters and firewalls in our way.
Nmap is an open-source tool and it’s seen many updates throughout the years. It can be run on Linux, Windows, Mac OS, and various other systems. You can download it here. Nmap is actually a command-line interface, so it’s not much to look at; however, there is a Graphical User Interface (GUI) version of Nmap,called “Zenmap.” Zenmap can do everything Nmap can do, but its ease-of-use makes it a great alternative to the command-line interface. Zenmap also offers a “visual” network mapping function, which allows you to actually see a visual representation of the network you’re scanning. Whichever version you want to use is up to your preference. The commands for Nmap and Zenmap are the same. I’ll be using the command-line interface.
Scanning Techniques
Using Nmap isn’t difficult, but you need to remember the types of scans you can run. Some common ones are discussed below, but you can refer to the Nmap manual if you need to perform a different kind of scan. Which scan you want to use depends on your needs and if you want to side-step event logging (AKA covering your tracks). I would suggest familiarizing yourself with TCP before moving on to the next section.
TCP Connect Scan
Out of all the scans you can use, connectivity via TCP is the simplest scanning technique since we predominantly rely on TCP to establish our connections anyway. With a TCP Connect scan, an attacker attempts to establish a connection on a port of a target system with a TCP three-way handshake. This handshake is the normal process of establishing communication between client and server. The target port is open if the connection is successfully established, indicated by a packet sent with a SYN/ACK from the server. The scan is initiated with the -sT switch
However, the attacker knows that the target port is closed if the packet with an RST flag is sent by the target host. Unfortunately, the TCP Connect scan is not very stealthy and it’s one you’d probably want to avoid as a penetration tester. As you can see, you are sending an ACK back to the target and, therefore, completing the connection. The TCP Connect scan can identify you, and that may not be something you want. If you’re performing this scan on your own network, then it’s a useful scanning technique. The TCP Connect scan can be initiated with the -sT switch.

A TCP Connect Scan. Reprinted from “The Preattack Phases,” by the University of Maryland University College, 2012.
SYN Stealth Scan
This scan is called a “half-open scan” because, unlike the TCP Connect scan, a full TCP connection is never established. An attacker generates an initial SYN packet to the target during the first step of the TCP three-way handshake. If the port is open, the target responds with a SYN/ACK, just as it should. However, the key to the SYN Stealth scan is that the attacker does not respond back with the ACK, meaning the TCP connection is never fully established. This scan is initiated with the -sS switch
On the other hand, some firewalls only log established connections, not half-open connections. Since no connection is established in a SYN stealth scan, it can pass through the firewall without being logged. You’ll know there is a firewall between you and the target system if there is no reply to the initial SYN packet. It’s important to note that a SYN stealth scan is not entirely stealthy because many firewalls and IDSs can detect these scans. Snort, a common IDS, can definitely detect various port scans. If the port is closed, the attacker receives an RST from the target, just like the TCP Connect scan. Nmap called this the “TCP SYN scan” and it is the default scanning option. Initiate a TCP SYN scan with the -sS switch.
NULL Scan
From the attacker’s perspective, the NULL scan is not always reliable since not all hosts comply with the specifications of TCP. In a NULL scan, an attacker sends a data packet without any flag set, meaning all the bits are 0. If the port is open, the target host ignores the packet and does not respond. But, according to the rules of TCP, when a packet is sent to a port with no bits set, the target is supposed to respond with an RST packet if the port is closed. Some hosts send an RST packet in response to a null packet, regardless of whether the port is open or not. That is why the NULL scan is considered unreliable since you can’t really come to any conclusion using a NULL scan. You can initiate a NULL scan with the -sN switch.
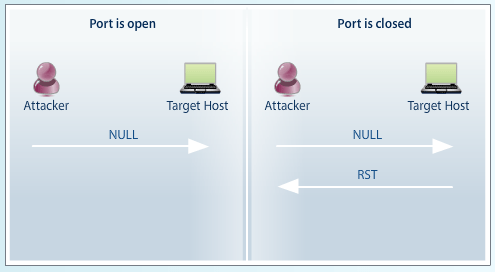
Null scan. Reprinted from “The Preattack Phases,” by the University of Maryland University College, 2012.
FIN Scan
Just like a NULL scan, the FIN scan is unreliable. In this case, the attacker sends a FIN packet to the target. The FIN packet is able to bypass firewalls because firewalls try to avoid any errors with legitimate FIN packets. The target simply ignores the FIN packet if the port is open. The target responds with an RST if the port is closed. Some hosts will send an RST packet regardless of the port being open or closed, making the FIN scan just as unreliable as the NULL scan. You can use a FIN Scan using the -sF switch.
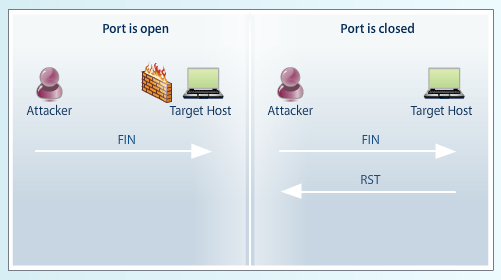
FIN scan. Reprinted from “The Preattack Phases,” by the University of Maryland University College, 2012.
ACK Scan
Attackers use ACK scanning to learn which firewall ports are filtered and which are unfiltered, not whether the port is open or not. An attacker sends an ACK packet to the target port’s firewall. If there is no response or an “ICMP destination unreachable” message is returned, then the port is considered to be filtered. This is likely because firewalls block ICMP packets from outside of a network. This also means that the firewall is stateful because it knows that no internal host has initiated any SYN packet that matches the ACK packet sent by the attacker (Recall that stateful firewalls keep track of sessions). If the target’s firewall returns an RST, then the port is unfiltered since the firewall has allowed the system to respond. This simply means that there is a firewall, but there is no firewall rule for that specific port. The ACK scan is accomplished using the -sA switch.
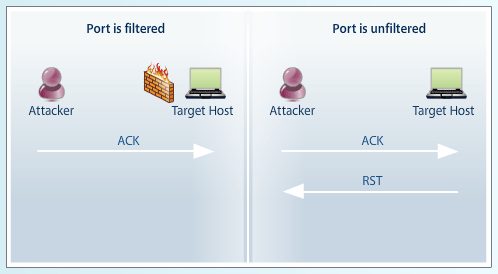
ACK scan. Reprinted from “The Preattack Phases,” by the University of Maryland University College, 2012.
XMAS Tree Scan
This scan gets its name from the fact that a combination of three flags sent to the target (URG, PUSH, and FIN), light up with different colors and flash similar to Christmas tree lights (or somebody must have thought it did). An attacker sends this crafted TCP packet to the target. If the port is open, the system should not respond. On the other hand, a closed port responds with an RST packet. You have to be careful though. Some systems, especially routers, can be vulnerable to an XMAS Tree scan. When a vulnerable system receives this packet, it doesn’t know what to do. As a result, it might reboot or even crash. The XMAS Tree scan can be initiated with the –sX switch
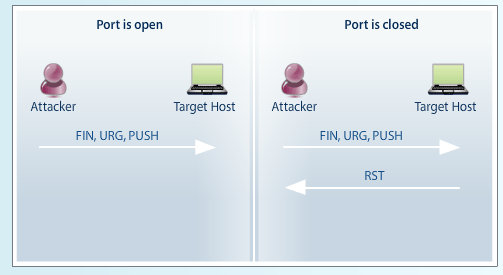
XMAS Tree scan. Reprinted from “The Preattack Phases,” by the University of Maryland University College, 2012.
This is not an exclusive list. There are many other scanning techniques you can use. So far, we’ve only utilized TCP. If we solely relied on TCP, we’d miss out on all the services that use UDP, such as DNS and DHCP servers. With that being said, there is a UDP scanning option available (-sU). In addition to a UDP scan, there are other scans that can assist you in your reconnaissance efforts. Just review Nmap’s scanning technique manual.
Using Nmap for Active Reconnaissance
I am on a small, virtual network in a contained environment and I have permission to do what I’m doing. You should know that port scanning is not technically illegal; however, you must follow the rules of the network you are on. Administrators may see port scans as particularly invasive and evidence of an attack. Though port scanning is mainly a method for network analysis and recon, others may disagree. So, it’s important to perform this reconnaissance on your own network or a network where you have permission from the owner. Otherwise, you could face litigation.
Using a “Ping Sweep,” I can identify live hosts on the network I’m connected to. A ping sweep works by sending ICMP echo requests to each IP address on the network or subnet. Only live systems should reply with an ICMP echo reply. This let’s me know that we have active systems and they’re accepting ICMP packets. I can also use an “ARP Sweep” to accomplish the same thing. ARP would probably be better since not every system replies to ICMP. From my initial ping sweep, I see that we have 3 hosts on the network: 192.168.100.103, 192.168.100.105, and 192.168.100.106. We’ll name these Host A, Host B, and Host C, respectively.
Using a TCP Connect Scan, we can find which ports are open on each host. Recall that a TCP Connect scan creates an established TCP connection with the target by completing the TCP three-way handshake.

Running nmap -sT on each host.
We can see that Host A, B, and C are up and each one has a series of open ports and services running. Host A (192.168.100.103) has quite a few open ports, in particular, it’s running FTP, Telnet, HTTP, HTTPS, Microsoft RPC, NetBIOS, MySQL, VNC-HTTP, and so on. This tells me that Host A is likely a Web server that hosts not only Web pages, but also files and databases. Host B (192.168.100.105) has only the SSH and VNC services running, which indicates that it’s likely a VNC server with remote encrypted connection capabilities using an SSH tunnel or terminal emulator. Host C (192.168.100.106) is running SSH and DNS zone transfers, suggesting it could be a DNS server.
So, without physically touching or seeing these systems, we’re able to come to an educated guess of the identity of these systems. That is EXTREMELY useful. Imagine your manager comes to you and asks for a complete inventory of physical network assets. You can use Nmap to quickly scan the network and enumerate the various devices that are attached. Problem solved. You can also identify any open ports that shouldn’t be open. You’re hitting two birds with one stone.
Nmap also has the capability to determine the Operating System (OS) running on a system. This can be achieved by typing the -O switch in the Nmap command-line. Unfortunately, the Nmap tool is not without its flaws. When there is a lack of available information or too many potential OS matches for the current host being scanned, the Nmap tool will usually display an “OS undetected” result message.
However, there are features that will allow the Nmap tool to perform one or even all of the following alternatives. By using –osscan-limit for OS detection results with too many possible matches, the Nmap tool will limit match results to the best possible OS of the target host. If, on the other hand, the results do not yield a perfect match, a user may use the –osscan-guess command, which offers the user the best-possible matches to different OS’s running on the target host. Each possible OS is supplemented with the Nmap tool’s confidence level displayed in the form of a percentage.

nmap -sS -O 192.168.100.105 yields a “no exact” OS match result.
If the above-mentioned solutions to inadequate OS detection results do not generate any useful information, then using the “verbose” option -v may be a promising substitute. Using the verbose option is highly recommended. For example, an Nmap OS detection scan may not reveal any useful results for potential OS matches on the target; however, after adding in the verbose option, the results may yield a Service Info field. This field will indicate a broad category of the OS running on the target, for example, Linux. Linux would be a broad category since there are many Linux distributions. By incorporating an additional OS detection technique in this example, referred to as “banner grabbing,” a user may be able to deduce which version of the OS is running on the target. This can be achieved by entering the –script=banner command into the Nmap command-line.
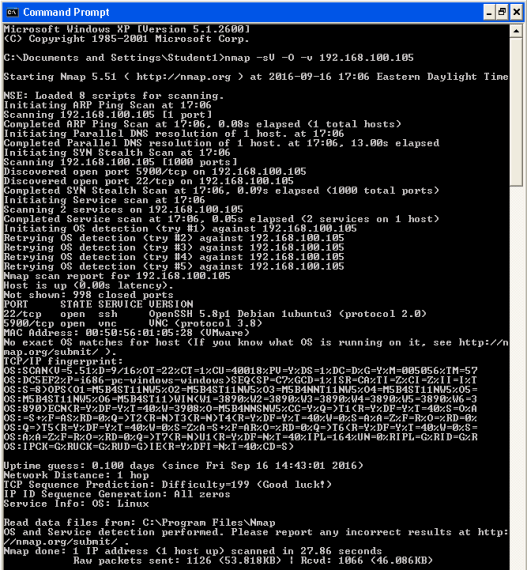
. nmap -sV -O -v 192.168.100.105 displays a “Service Info” field towards the bottom of the results. This field confirms that the OS running on Host #2 is a Linux-based OS
As I mentioned previously, the Nmap tool offers a feature that allows a user to determine whether a firewall rule is filtering a port. This can be done via an ACK port scan (-sA). This is considerably useful for attackers and penetration testers since it allows them to assess the difficulty level of exploiting a host.
This feature should also allow network administrators to confirm which hosts are protected by a firewall as well. If a firewall is not present where it should be, or if a port is unfiltered when it should be filtered, then a firewall administrator can reconfigure the firewall policy. The -sA command was run on Host #1 through 3 and, after the test was complete, it was determined that there was no firewall filtering the scanned ports.
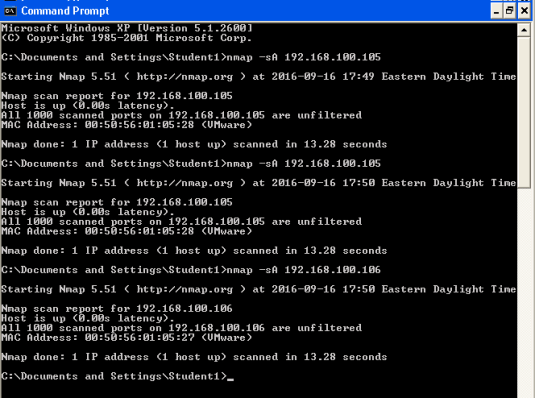
nmap -sA 192.168.100.103-106 indicates that no firewall rule is present on any host for the ports scanned
Conclusion
You can experiment with Nmap for yourself, but just make sure have permission to do so. With Nmap, we can discover what hosts and services are up and running on a network, but there are dozens of other characteristics I neglected to mention. Be sure to check out the Nmap reference guide here before you begin.
References
Lyon, G. (2018). Chapter 15. Nmap Reference Guide.
University of Maryland University College. (2012). The Preattack Phases [Online Module]. Retrieved from the University of Maryland University Website.

[…] the network, a process called “topology discovery.” This can be done using tools like nmap. They can also conduct port scanning, which enumerates the services running on each system. Some […]
LikeLiked by 1 person
[…] you don’t already know your targets, you can use nmap to identify a list of hosts currently residing on the network. One of the targets must be the […]
LikeLiked by 1 person