
Snort is an open-source, signature-based Network-based Intrusion Detection System (NIDS). Actually, Snort is much more than just a NIDS because it also acts a packet analyzer and a Network-based Intrusion Prevention System (NIPS). Snort was originally developed to be a packet analyzer, and with such sniffing capabilities, it can be used to detect intrusions on a given network segment.
Among the typical features you would see in an IDS, Snort has several useful capabilities, including information gathering, logging, detecting, alerting, and preventing malicious traffic on a network. Snort works by implementing Snort rules, which follow a specific syntax template (I’ll get into that in a moment). There are thousands of default Snort rules provided by Snort; however, if necessary, a security administrator may craft his/her own Snort rules.
How Does Snort Work?
Typically, the packets we want to examine are coming from the Internet, so your Snort sensor will be at the perimeter, separating your internal network from the outside world. Where you want to place the sensor (e.g., before, after, or inside the firewall), depends on you. If you want your sensor to see all the traffic, then you would follow the scheme: Internet > Router > Sensor > Firewall > Switch > Internal network. If, on the other hand, you want the sensor placed before the firewall, then you would only be able to see the traffic passing through the firewall. In that case, you would follow the scheme: Internet > Router > Firewall > Sensor > Switch > Internal network.
You can also place Snort sensors anywhere you wish to monitor traffic, such as on the network where you’re hosting critical servers or even on the servers themselves.
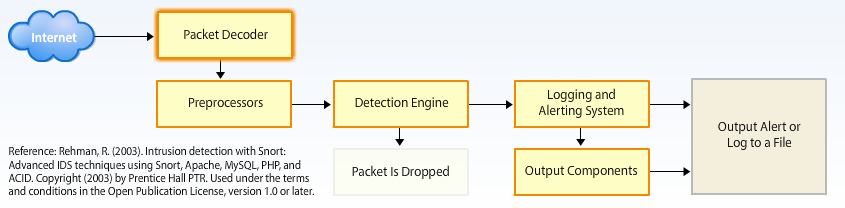
How Snort Works. Reprinted from “Intrusion Detection and Prevention Systems,” by UMUC, 2012.
Whichever layout you decide, network traffic will pass through a “Packet Decoder.” Maybe it’s a PPP connection, an Ethernet (copper or fiber-optic) connection, or whatever. The purpose of the Packet Decoder is to prepare the packets for the Preprocessors.
The “Preprocessors” receive the traffic, which allows Snort preprocessor plug-ins to perform highly complex functions, including TCP stream reassembly, IP defragmentation, statistics gathering, or HTTP request normalization. You can add Snort preprocessor plugins by modifying the “spp_something.c” and ”spp_something.h” files. Ultimately, their job will be to modify the packets so that they can be compared against the rules of the Detection Engine.
The “Detection Engine” receives packets from the preprocessors and compares them to a list of Snort rules. If a packet ends up matching any of the rules, it generates the appropriate alert and message to the security administrator. If nothing matches, the packet is ignored or dropped.
Packets that were matched to a Snort rule head to the “Logging and Alerting System,” which send the information out for logging in a lof-file format, such as tcpdump and .pcap files. Administrators can then analyze these files for further inspection.
Snort Rules
Since Snort is a signature-based NIDS/NIPS, it follows predetermined rules. Snort rules are composed of two parts. The “Header” specifies the action Snort will take. These include factors regarding rule actions, such as log or alert. The header also contains the part of the Snort rule that includes the source and destination IP address, source and destination port number, and the protocol in use. The second part of the Snort rule are the “Options.” The Options is where a security administrator can define what is involved in the packet and the message that will be displayed when Snort matches the rule to a packet.
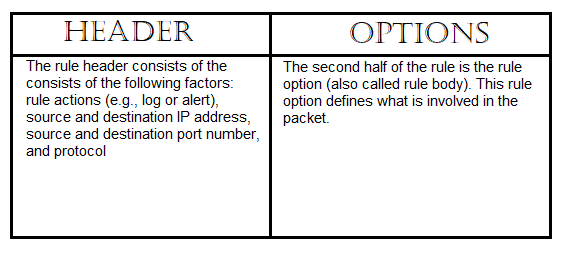
Header and Options. Reprinted from “Intrusion Detection and Prevention Systems,” by UMUC, 2012.
Snort Rule Syntax
Snort follows a specific syntax. In away, it’s similar to firewall rules, but the Options body provides more power than a firewall. The syntax is shown below.
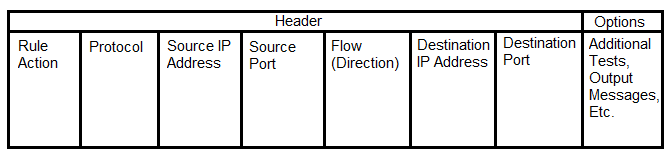
The Snort rule syntax. Reprinted from “Intrusion Detection and Prevention Systems,” by UMUC, 2012.
Let’s go through each one of these fields. Afterwards, we can practice writing Snort rules:
- Rule Action: In this field, you can choose one of five built-in rule actions: Log, alert, pass, activate, or dynamic. The most common rule action is the “alert” option, which logs the packet and the action taken and then alerts the security administrator.
- Protocol: This specifies the protocol in use, such as high-level protocols like HTTP and low-level protocols, like TCP, UDP, and ICMP. You can choose whichever one you wish to create your specific rule.
- Source IP address: This field is the source address of the packet. This can be a single IP address or network ID. If, for instance, you want to alert to traffic from any source IP address, you can use “any.”
- Source Port: This field is the source TCP or UDP port of the packet. Again, you can also use “any” if you want to specify all 65,535 ports.
- Flow (Direction): This field determines the direction of a packet flow, usually using the “–>” (directional arrow) symbol.
- Destination IP address: This is the destination the packet is intended to go to. It can be a single IP address, network ID, or “any” address.
- Destination Port: This is the destination TCP or UDP port the packet is intended to go to. It can be a single IP address, network ID, or “any” address.
- Options: As I mentioned, a lot of Snort’s power comes from the Options body. Let’s stop here and address some of these “options.” The Snort rule options help refine the rule itself.
-
- Content: This is a keyword(s) used to find a string pattern inside a packet payload. This can be in ASCII, binary, or hexadecimal format. For example, some forms of malicious executables have a specific binary or hexadecimal string. If you know this string, you can specify it here and Snort will alert you if it detects it on your network.
-
- Offset: The offset keyword can be used to specify the start of a search after a certain byte in the packet. For example, if you want to start your search after a particular number of bytes in the packet, you can do that here.
-
- Depth: The depth keyword is used to specify a search that is limited to a certain byte in the packet. This is similar to the Offset option; however, this time we are looking for keywords in a specific range of bytes in the payload.
-
- No-Case: This is used to turn off a case-sensitive search.
-
- Content-List: This keyword is used to locate a particular text file that contains a keyword, such as “password” and “ssn.” Snort could, for example, look through a file for these keywords. I believe you can also use Snort to for Internet searches. For example, if a user searched for a keyword “porn,” the security administrator would be alerted.
-
- Flags: The flags keyword can be used to detect missing or inappropriate flags set in a TCP header. Sometimes, missing flags are an indication of a port scan or attack.
Let’s Create Some Rules
Now that you know the syntax of a Snort rule, crafting your own rules won’t be as difficult to do!
Example #1:
Let’s say we own an email server at 131.171.127.1. We want to protect this server from receiving any emails from the network 192.168.1.0 subnet 255.255.255.0 containing the word “hacking” inside. We can craft the following Snort rule:
alert tcp 192.168.1.0/24 any -> 131.171.127.1 25 (content: “hacking”; msg: ”malicious packet”; sid:2000001;)
This Snort rule generates an alert for any tcp traffic coming from the 192.168.1.0/24 network on any source port to our email server (131.171.127.1) on destination port 25 if the word “hacking” is contained in the email. The destination port number is 25 because SMTP uses TCP port 25 to send emails to email servers. This Snort rule generates a message to the security administrator: “malicious packet.” The Snort ID (sid) just identifies the Snort rule number. It isn’t important.
Example #2:
Rewind back to 2008. You want to protect your network from the Conficker A worm. The binary string and shell code for the Conficker A worm is available online and the worm uses TCP port 445 for infection. We could craft the following rule:
alert tcp any any -> any 445 (msg: “conficker.a shellcode”; content: “|e8 ff ff ff ff c1|^|8d|N|10 80|1|c4|Af|81|9EPu|f5 ae c6 9d a0|O|85 ea|O|84 c8|O|84 d8|O|c4|O|9c cc|IrX|c4 c4 c4|,|ed c4 c4 c4 94|&<O8|92|\;|d3|WG|02 c3|,|dc c4 c4 c4 f7 16 96 96|O|08 a2 03 c5 bc ea 95|\;|b3 c0 96 96 95 92 96|\;|f3|\;|24|i| 95 92|QO|8f f8|O|88 cf bc c7 0f f7|2I|d0|w|c7 95 e4|O|d6 c7 17 f7 04 05 04 c3 f6 c6 86|D|fe c4 b1|1|ff 01 b0 c2 82 ff b5 dc b6 1b|O|95 e0 c7 17 cb|s|d0 b6|O|85 d8 c7 07|O|c0|T|c7 07 9a 9d 07 a4|fN|b2 e2|Dh|0c b1 b6 a8 a9 ab aa c4|]|e7 99 1d ac b0 b0 b4 fe eb eb|”; sid: 2000002; rev: 1;)
This Snort rule will generate an alert for any tcp traffic coming from any source IP address and any source port to any destination IP address on TCP port 445 if it detects the shell code for the Conficker A worm. The message it generates to the security administrator will be “conficker.a shellcode.”
EXAMPLE #3:
You have a Web server at 192.168.10.5. You want to detect TCP SYN floods against this server coming from any source IP address and source port. What Snort rule can you craft to detect this type of attack?
Alert tcp any any -> 192.168.10.5 443 (msg: “TCP SYN flood”; flags:!A; flow: stateless; detection_filter: track by_dst, count 70, seconds 10; sid:2000003;)
This Snort rule will generate an alert for ACK flags missing in a TCP three-way handshake from any source IP address and any source port sent to the destination IP address 192.168.10.2 on TCP port 443 (HTTPS). Let us say, for instance, that the client wishes to establish a connection with the server. During a typical TCP three-way handshake, the client will send a SYN flag and a random ISN to the server. The server will then respond with a SYN+ACK flag and, as a result, the client should respond with a ACK flag to acknowledge that the connection is complete and data can begin transmitting
However, if the client doesn’t send the ACK flag (or an RST flag) to the server, then this would be a “half-connection” and a possible indication of a stealth SYN port scan attack. You should know this from my DoS and DDoS attacks post ;). If an ACK flag is missing, then the A! Flags option will capture the packet. If there are many half-connections being sent to 192.168.10.5, then this would be a strong indication of a SYN flood attack against our Web server. This Snort rule generates a message to the security admin, “TCP SYN flood.”
Conclusion
My intention in this most blog post is to offer you an initial understanding of writing Snort rules by providing you with the basic starting principles. To master Snort rules, you should familiarize yourself with the Snort user manual, especially the options body. This is because there are many options to choose from.
References:
Snort Users Manual. (2015). The Snort Project. Retrieved from http://manual-snort-org.s3-website-us-east-1.amazonaws.com/
University of Maryland University College. (2012). Intrusion Detection and Prevention Systems. [Online Module]. Retrieved from the University of Maryland University Website
Werner, T. (2009). Detecting Conficker. The Honeynet Project. Retrieved from https://www.honeynet.org/node/388

Such an informative post. I am planning to build a hybrid IDS using snort using PHAD on the raspberry pi. could you please give me some advice or instructions. thank you.
LikeLike
Hi, mrlohan. Try this for reference: https://blog.holdenkilbride.com/index.php/2016/10/25/turn-your-raspberry-pi-into-a-snort-ids/
LikeLike
Thanks, man. I appreciate it. while there are a lot of security blogs out there and I tried to ask for help, you are the only one who replied to my comment.
LikeLiked by 1 person
Sorry to hear that! But glad to help
LikeLike
Hi,
Is it possible to capture wireless traffic in the wireless interface (Laptop/Rpi) using Promiscuous mode in Snort? because snort is optimized for only Ethernet interfaces and snort IDS mode works in promiscuous mode. and i just read that ” Promiscuous mode works only for Ethernet interfaces and is not able to decode wireless 802.11 frames.”
Are there any methods?
LikeLike