A “subnet” is nothing more than just a segmented network; In other words, it is a larger network separated into smaller networks. Subnetting offers numerous benefits in terms of performance, security, and management.
This discussion focuses on “Classful” subnetting first. Classfulsubnetting follows a network design of either Class A, Class B, or Class C networks, but this form of subnetting does not scale well because it wastes IP addresses. “Classless Inter-Domain Routing (CIDR),” which is based on “Variable Length Subnet Masks (VLSMs),” was created in the early 1990s to help remedy this problem. You might be asking, “why do I have to learn classful subnetting if we don’t use it anymore?” It’s because classful subnetting is great practice for VLSM subnetting.
Why Do We Subnet?
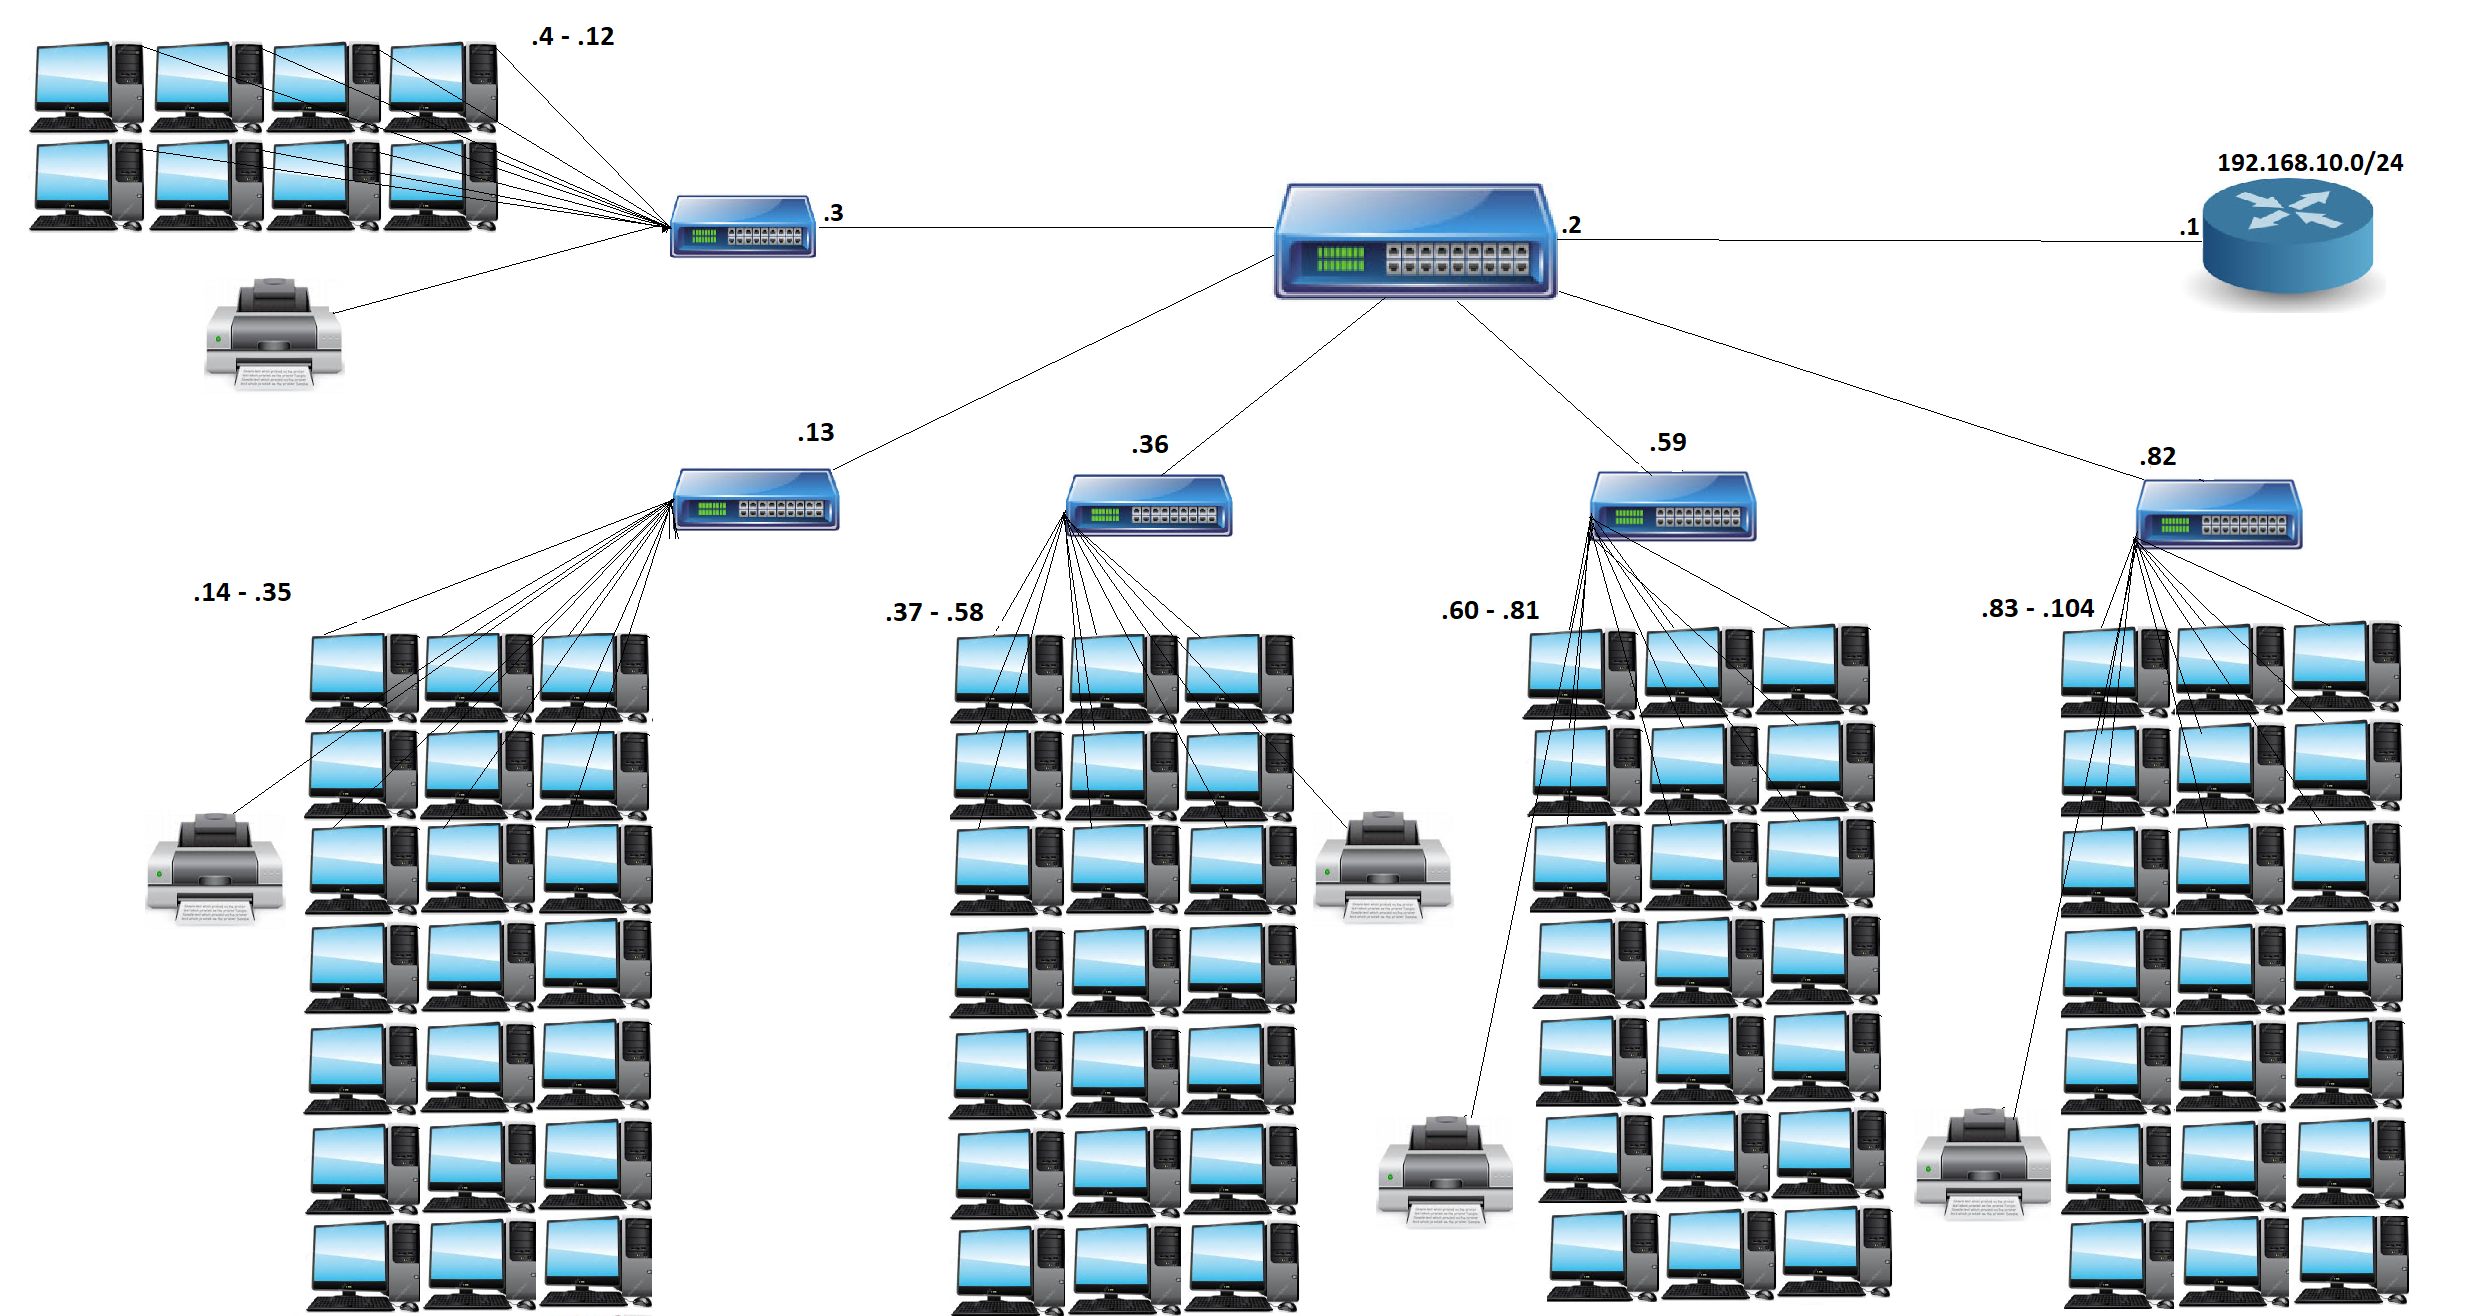
By now, you’ve learned that having one giant network isn’t a good thing. By having a large network, we also have a large “broadcast domain.” Take a look at the network design below. It’s highly oversimplified, but good for demonstration purposes. This network is all just one network. It has 5 switches that connect to a backbone switch and then to a router. The host addresses are indicated by a “.# – .#” range. Keep in mind, what makes a large broadcast domain is relative from person-to-person. For example, a large broadcast domain might not actually be inherently bad if your network equipment can manage it. However, in many cases, large broadcast domains introduce more broadcast traffic, such as ARP messages, which will all transmit on the same LAN segment (not good).
By examining this network design, we can see that every device in the 192.168.10.0/24 network is in the same Local Area Network (LAN) because they all belong on the same router interface (192.168.10.1). A /24 subnet only provides 254 hosts addresses and this design has 103 devices composed of host devices, printers, and switches. From a networking perspective, it makes more sense to split this network up into smaller, manageable subnets.
This network design also is not as bad as some other subnets out there, which might hold up to 2,000+ hosts. By subnetting our networks, it allow us to enjoy increased network performance by reducing broadcast and multicast traffic, save IP addresses, and improve network security.
Subnetting Class C Networks
Take another look at the network design above and observe how many networks you can make from this one larger network. If you said 6, that’s right (although there is more than one answer). Normally, choosing how many subnets you need would really depend on how many hosts you need. In a Class C network, there are 8 bits available in the host address portion to assign host IP addresses (Note: These are the “unmasked” bits in the octect of interest – 11111111.11111111.1111111.00000000). I’ve put together a table below that will help you subnet a Class C network. If you don’t understand how I produced these numbers, don’t worry. I will walk you through the steps.
Knowing that we have the network address of 192.168.10.0, let’s split this into 6 subnets. Using the table above, we’ll need a /27 network because the /26 network only yields 4 networks, which isn’t enough for this new network design. By using the /27 network, we have 8 subnets, leaving two subnets as a remainder. That’s just what we need.
Step 1
An easy way to find out how many subnets a chosen subnet mask can produce is to use the equation 2^x = the number of subnets (# of masked bits). The x represents the number of masked bits (or 1’s) that are in the octet of interest. In a /27 network, there are 3 masked bits in the host address portion of the subnet mask. Therefore, 2^3 = 8 subnets, which is exactly what the table shows above.
Step 2
The next step is to identify how many hosts are available for the /27 network. To find the number of hosts that are available, use the equation 2^y -2 = the number of hosts available (# of unmasked bits). The y stands for the number of unmasked bits (or 0’s) in the host address portion. Therefore, 2^5 = 32 hosts. However, this isn’t our answer yet because you need to reserve 2 important address. These two addresses are the network address and the broadcast address. This is why we subtract “2”in this equation. For that reason, the true number of hosts is 30 hosts per subnet.
Step 3
After we’ve identified the number of hosts, we identify the block size. This can be accomplished using the equation 256 – the octet of interest = the block size. The octet of interest is obviously the 4th octet in the subnet mask, which is 224. After plugging this into the equation, we get 256 – 224 = 32. With this number, we can identify our subnets: 0, 32, 64, 96, 128, 160, 192, and 224. These are our 8 subnets, but we only need 6. All I did was start from 0 and increment up by a block size of 32. We can’t go any further after 224 because the next number would be 256, which will not work.
Step 4
Now, it’s time to identify the network address and the broadcast address for each of the subnets above. The network address for the first subnet always starts at “0,” then increment up by 32. On the other hand, the broadcast address is always the number before the next sequential subnet number:
The 0 subnet broadcast address is 31
The 32 subnet broadcast address is 63
The 64 subnet broadcast address is 95
The 96 subnet broadcast address is 127
The 128 subnet broadcast address is 159
The 160 subnet broadcast address is 191,
The 192 subnet broadcast address is 223, and
The 224 subnet broadcast address is 255
As an example, if you wrote this out as actual IP addresses, the 192.168.10.96 subnet has a broadcast address of 192.168.10.127. Another example is that the 192.168.32 subnet has a broadcast address of 192.168.10.63.
Step 5
And for the final step, you must identify the host range for each subnet. These will be the numbers between the subnet network address and the broadcast address.
The 0 subnet host range is 1-30
The 32 subnet host range is 33-62
The 64 subnet host range is 65-94
The 96 subnet host range is 97-126
The 128 subnet host range is 129-58
The 160 subnet host range is 161-190
The 192 subnet host range is 193-222, and
The 224 subnet host range is 225-254
As an example, if you wrote this out using actual IP addresses, the 192.168.10.96 subnet would have a valid host range between 192.168.10.97 to 192.168.10.126. As another example, the 192.168.10.0 subnet would have a valid host range between 192.168.10.1 to 192.168.10.30.
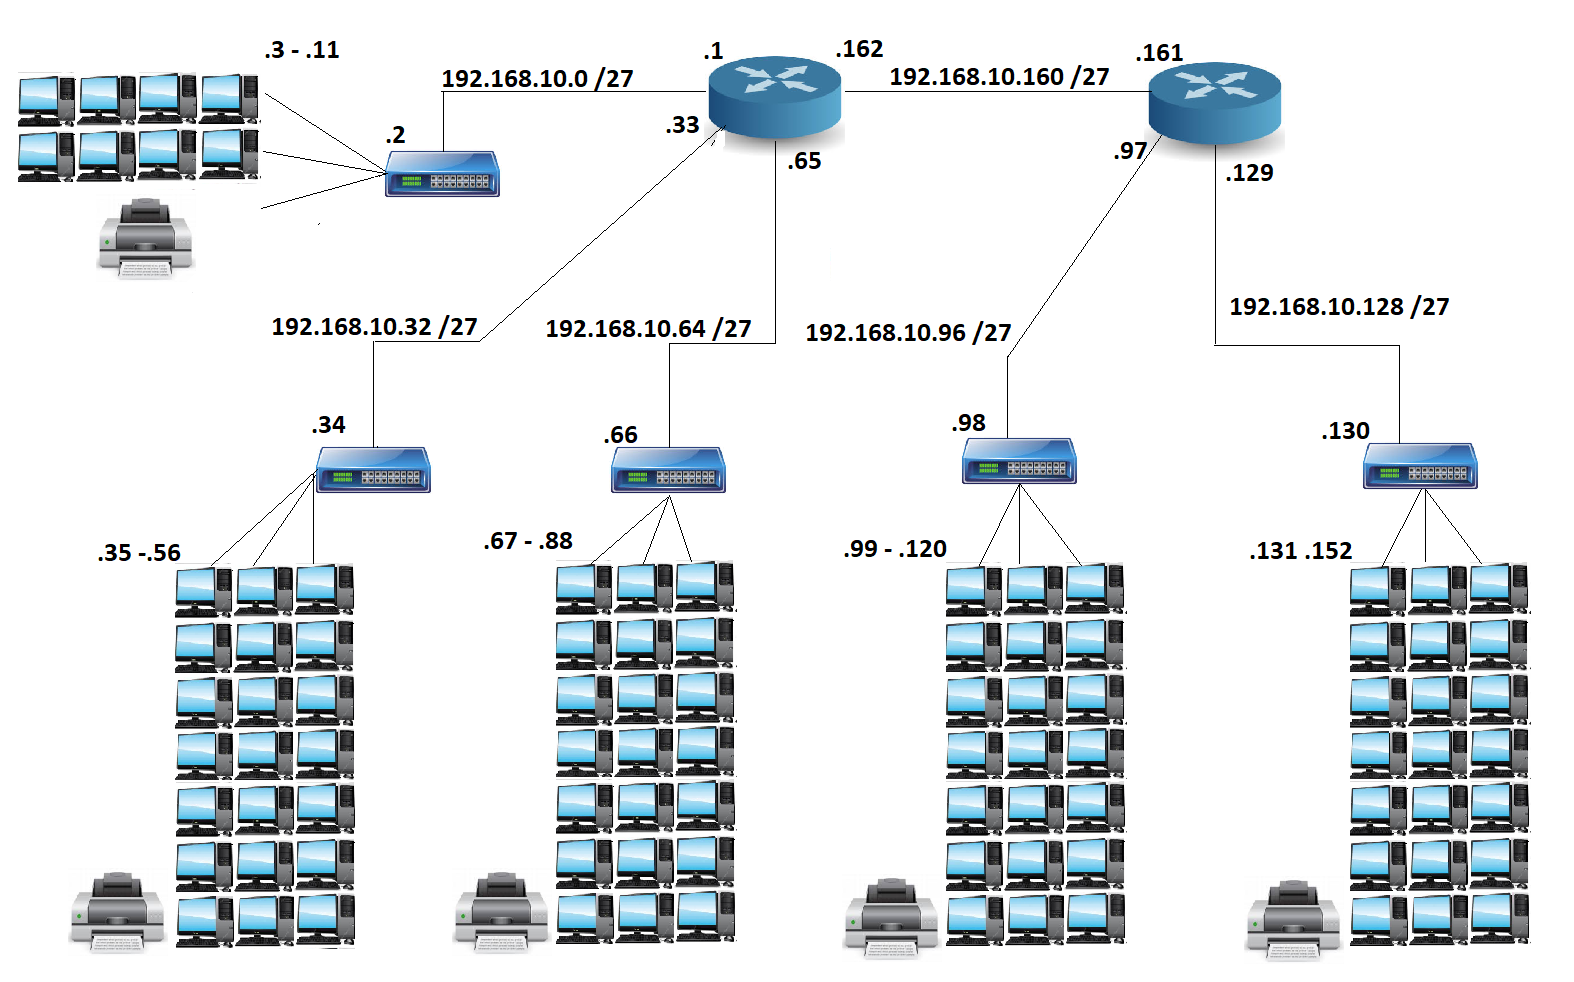
With this information, we can create a new network, which is depicted below. Looks better. This would be a typical “classful” network. Looking at the new network design, you can see that there are now 2 routers, which are connected through a serial link. We have now segmented our network into 6 subnets, which means our original network design that was 1 giant broadcast domain has now split into 6 smaller broadcast domains.
But, you’re not finished yet. We need to address an important issue first. This is obviously a better network design than the first, and it would work, but it could be better if we didn’t use a classful network design.
Variable Length Subnet Masks (VLSMs)
As I said, there’s something wrong with this new network design. The answer is we’re wasting valid host addresses. We also wasted the 192.168.10.192 and the 192.168.10.224 subnets! Also notice that the 6 subnets in the new network design are all /27, meaning they can all hold a max of 30 hosts. But, subnet 192.168.10.0 /27 has 11 hosts (and that includes the switch and router interface), leaving 19 left over. Even worse, subnet 192.168.10.160 /27 (the serial link between the two routers) has only 2 hosts with a whopping 28 hosts left over. This is because every router interface has the same /27 subnet mask. That is classful subnetting, and you can see where it gets us into trouble. This type of network would work; however, it would be much better if we gave each router interface its own subnet mask.
Keep in mind that this is just a small example. Now, imagine this on a larger scale and picture an organization that has 3,000 IP addresses and they had to subnet a Class B network block. That would waste 62,000 IP addresses. As we can see, classful subnetting wastes IP addresses. This is where “Variable Length Subnet Masks (VLSMs)” come in.
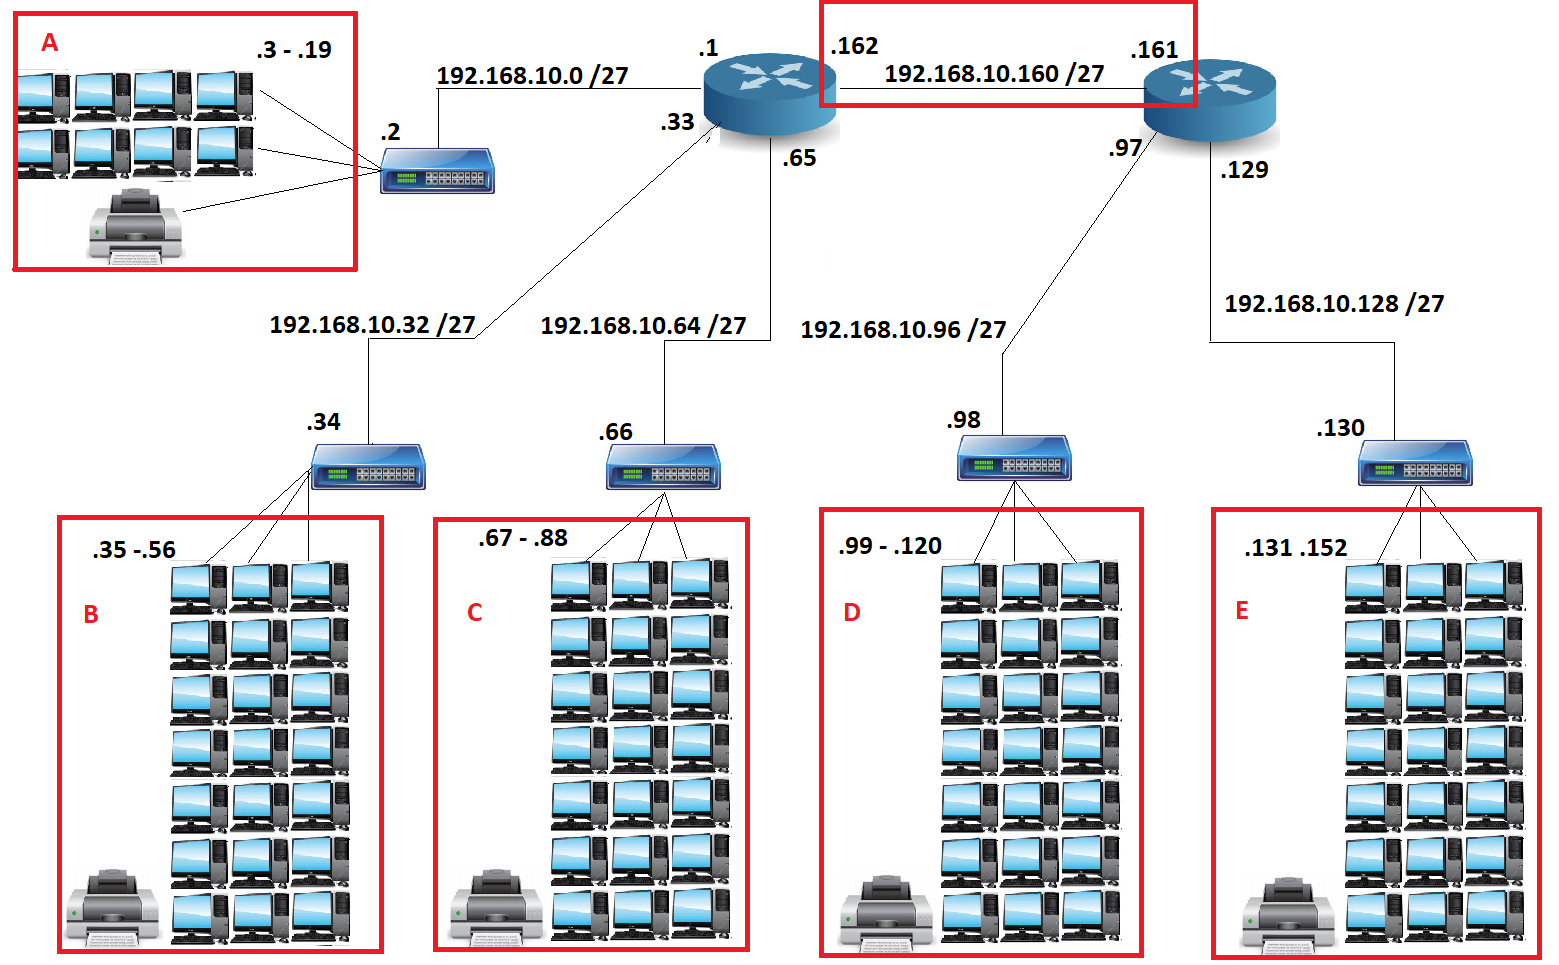
Using the diagram above, let’s identify how many hosts are in each subnet by counting each device. Although the switches and the router interfaces are not within the boundary of the red line, they also count as hosts! This will help us identify the correct, new subnet mask to use for each network.
Network A at 192.168.10.0 /27 needs 11 hosts.
Network B at 192.168.10.32 /27 needs 24 hosts.
Network C at 192.168.10.64 /27 needs 24 hosts.
Network D at 192.168.10.96 /27 needs 24 hosts.
Network E at 192.168.10.128 /27 needs 24 hosts.
Network F at 192.168.10.160 /27 needs 2 hosts.
Using this information, let’s refer back to the Class C subnet table. Doing so will help us identify the correct subnets for VLSM.
Which subnet mask should each network use?
Network A has 11 hosts; therefore, it can use a /28 subnet (16 total hosts).
Network B has 24 hosts; therefore, it can use a /27 subnet (32 total hosts).
Network C has 24 hosts; therefore, it can use a /27 subnet (32 total hosts).
Network D has 24 hosts; therefore, it can use a /27 subnet (32 total hosts).
Network E has 24 hosts; therefore, it can use a /27 subnet (32 total hosts).
Network F has 2 hosts; therefore it can use a /30 subnet (4 total hosts).
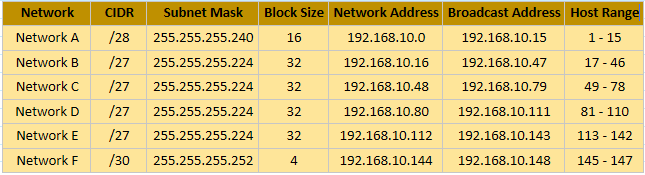
Do you see how each network has its own variable length subnet mask? Now, let’s create a table that helps us picture how this new network will look. This table will show us the new block size for each new subnet and where each subnet will begin. By going through steps 1 through 5 above one more time, we can begin to fill out the necessary information in each field.
With this table, we can identify each subnet. Network A starts at 192.168.10.0 and ends with its broadcast address at 192.168.10.15. Network B starts at 192.168.10.16 and ends at its broadcast address at 192.168.10.47. Network C starts at 192.168.10.48 and ends at its broadcast address at 192.168.10.79…You get the picture. The new network will now look like this:
I know that with this new VLSM network, I’ve saved valuable IP addresses. This is because with VLSMs, we provide for only the needed amount of hosts on each router interface.
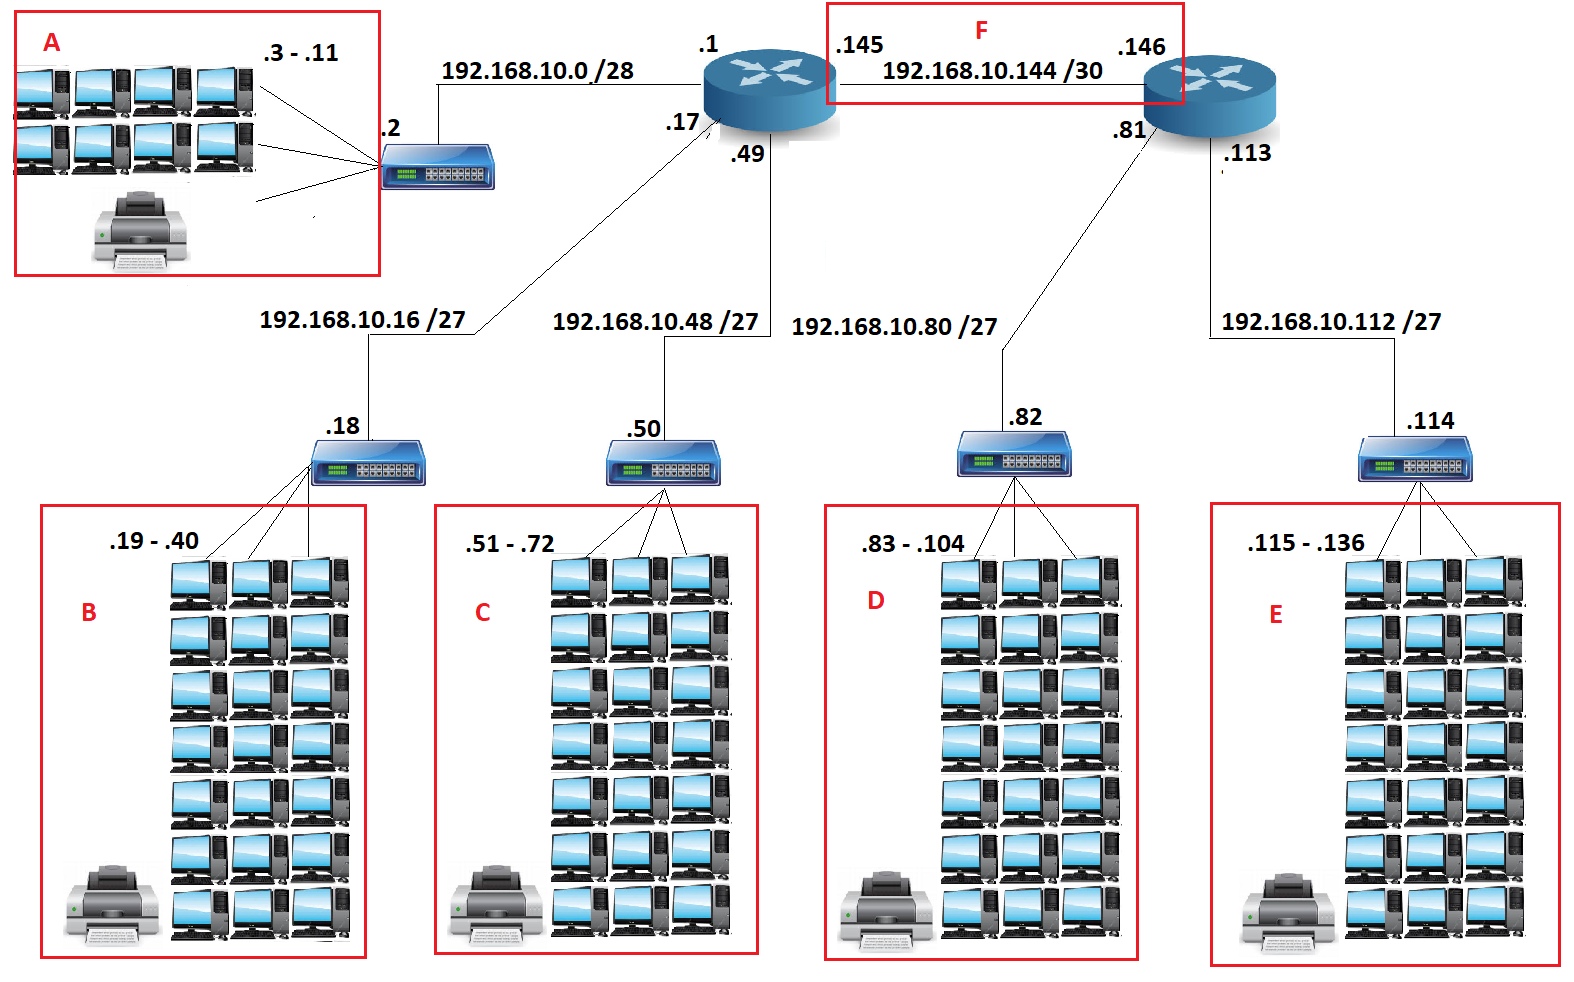
How do I know I saved IP address space? Recall how Network A used to be a /27 with 30 usable hosts available. Since there are 11 hosts on Network A, we were wasting 19 remaining host addresses. With this new network, however, it uses a /28, which uses only 14 usable hosts. Since we still have 11 hosts on Network A, we’re only wasting 3 hosts instead of 19. In addition, remember how Network F on the classful network was also using a /27 with 30 usable hosts? Since Network F only requires 2 hosts (the serial link on each router), this meant we were wasting 28 host addresses on a /27 network. But with the new /30 subnet, we have a limit of only 2 usable hosts, which means we are no longer wasting any host addresses at all. The figure below shows how the new VLSM network uses the host addresses.
This makes sure that no host address is overlapping into another subnet and it also ensures that each network is incrementing by the correct block size. Creating tables and figures like this help in both subnetting a network and when double-checking your work. With this, we can see how VLSMs are superior to classful subnetting.
References
Lammle, T. (2016). CCNA: Routing and Switching. Complete Study Guide. John Wiley & Sons: Indianapolis, IN.
Meyers, M. (2015). All in One CompTIA Network+ Certification Exam N10-006. McGraw-Hill Education: New York, NY.
 This network design also is not as bad as some other subnets out there, which might hold up to 2,000+ hosts. By subnetting our networks, it allow us to enjoy increased network performance by reducing broadcast and multicast traffic, save IP addresses, and improve network security.
 Knowing that we have the network address of 192.168.10.0, let’s split this into 6 subnets. Using the table above, we’ll need a /27 network because the /26 network only yields 4 networks, which isn’t enough for this new network design. By using the /27 network, we have 8 subnets, leaving two subnets as a remainder. That’s just what we need.
 But, you’re not finished yet. We need to address an important issue first. This is obviously a better network design than the first, and it would work, but it could be better if we didn’t use a classful network design.
 Using the diagram above, let’s identify how many hosts are in each subnet by counting each device. Although the switches and the router interfaces are not within the boundary of the red line, they also count as hosts! This will help us identify the correct, new subnet mask to use for each network.
 I know that with this new VLSM network, I’ve saved valuable IP addresses. This is because with VLSMs, we provide for only the needed amount of hosts on each router interface.
How do I know I saved IP address space? Recall how Network A used to be a /27 with 30 usable hosts available. Since there are 11 hosts on Network A, we were wasting 19 remaining host addresses. With this new network, however, it uses a /28, which uses only 14 usable hosts. Since we still have 11 hosts on Network A, we’re only wasting 3 hosts instead of 19. In addition, remember how Network F on the classful network was also using a /27 with 30 usable hosts? Since Network F only requires 2 hosts (the serial link on each router), this meant we were wasting 28 host addresses on a /27 network. But with the new /30 subnet, we have a limit of only 2 usable hosts, which means we are no longer wasting any host addresses at all. The figure below shows how the new VLSM network uses the host addresses.
I know that with this new VLSM network, I’ve saved valuable IP addresses. This is because with VLSMs, we provide for only the needed amount of hosts on each router interface.
How do I know I saved IP address space? Recall how Network A used to be a /27 with 30 usable hosts available. Since there are 11 hosts on Network A, we were wasting 19 remaining host addresses. With this new network, however, it uses a /28, which uses only 14 usable hosts. Since we still have 11 hosts on Network A, we’re only wasting 3 hosts instead of 19. In addition, remember how Network F on the classful network was also using a /27 with 30 usable hosts? Since Network F only requires 2 hosts (the serial link on each router), this meant we were wasting 28 host addresses on a /27 network. But with the new /30 subnet, we have a limit of only 2 usable hosts, which means we are no longer wasting any host addresses at all. The figure below shows how the new VLSM network uses the host addresses.
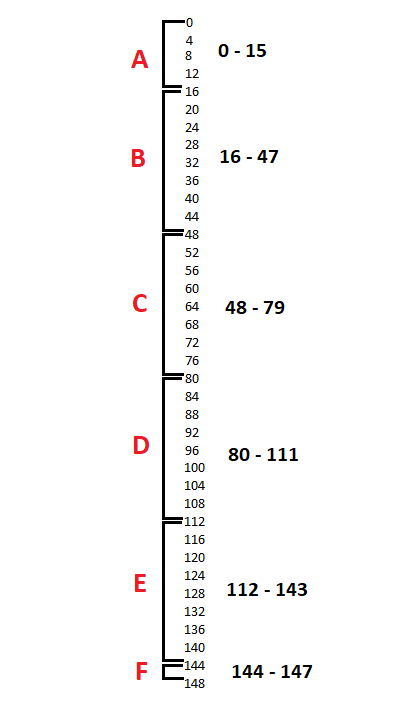 This makes sure that no host address is overlapping into another subnet and it also ensures that each network is incrementing by the correct block size. Creating tables and figures like this help in both subnetting a network and when double-checking your work. With this, we can see how VLSMs are superior to classful subnetting.
References
Lammle, T. (2016). CCNA: Routing and Switching. Complete Study Guide. John Wiley & Sons: Indianapolis, IN.
Meyers, M. (2015). All in One CompTIA Network+ Certification Exam N10-006. McGraw-Hill Education: New York, NY.
This makes sure that no host address is overlapping into another subnet and it also ensures that each network is incrementing by the correct block size. Creating tables and figures like this help in both subnetting a network and when double-checking your work. With this, we can see how VLSMs are superior to classful subnetting.
References
Lammle, T. (2016). CCNA: Routing and Switching. Complete Study Guide. John Wiley & Sons: Indianapolis, IN.
Meyers, M. (2015). All in One CompTIA Network+ Certification Exam N10-006. McGraw-Hill Education: New York, NY.
