
“Goodluck, I’m behind 7 proxies.”
Hackers (or at least good hackers) hide their IP address so they can evade detection from security admins or security system logs, such as firewalls and Intrusion Detection Systems. Every time we send information out on the Internet from our computers, each packet contains an IP header, which stores the source IP address. That IP address can be logged depending on what we’re connecting to on the other side; therefore, it’s important that the IP address is obfuscated.
The information provided on the cybersecurityman is for educational purposes only. I am in no way responsible for any misuse of the information provided. All the information here is meant to provide the reader with the knowledge to defend against hackers and prevent the attacks discussed here. At no time should any reader attempt to use this information for illegal purposes.The information provided on the cybersecurityman is for educational purposes only. I am in no way responsible for any misuse of the information provided. All the information here is meant to provide the reader with the knowledge to defend against hackers and prevent the attacks discussed here. At no time should any reader attempt to use this information for illegal purposes.
One way to accomplish this is through proxy servers, also called proxies. Proxies serve as intermediary devices between the connections we make online. For example, if I use a proxy and I make a TCP connection to a web server, the proxy will intercept that connection and make the HTTP request on my behalf, using its own IP address.
We can get technical and chain proxies together, which is something called “proxy chains.” This is when we use multiple proxies one-by-one.

Proxychain. Reprinted from “How To Use Proxychains To Evade Detection in Kali Linux,” by Shaik, S. (2016).
By stringing multiple proxies together, we make it more and more difficult for digital forensic experts to track down the original IP address. Law enforcement officials may be able to get a warrant or subpoena to receive the log files on one proxy, but they may not be able to get the log files for the remaining proxies. This is even harder to do if you are using proxies in different countries, or even countries that are an enemy of your own country.
Step 1: Configure Proxy Chains
Locate the proxychains configuration file by opening a terminal and executing the locate proxychains command. It should be located in /etc/proxychains.conf.

Clear the terminal with ctrl+l or type clear. Now, open up the proxychains.conf file in the Leafpad text editor by executing the leafpad /etc/proxcychains.conf command.

This opens the proxychains.conf file in the Leafpad text editor, which will allow us to make some changes to the file. Here is what the proxychains.conf will look like by default.

Let’s go over a few things before we move on.
This is proxychains.conf version 3.1. This file allows the user to add/remove proxies. There are 3 different settings to choose from.
- dynamic_chain: If the user uncomments the dynamic_chain line, a connection will be made with each proxy listed in the proxychain.conf file via chained proxies. For example, if the user has 5 proxies listed in this file, each proxy will be chained in the order they are listed. If, for whatever reason, a proxy cannot be connected to (dead proxy), it is skipped. At least one proxy must be online for this to work.
- strict_chain: This setting is the same as the dynamic chain setting in that every proxy in the list will be chained in the order that they appear; however, all proxies must be online for this to work. This is for people who follow a strict proxy chain formation. If one proxy is offline, it will not work.
- random_chain: In this setting, each connection in the proxy list will be done in a random order. This is good for staying anonymous, but if there happens to be a dead proxy, it can be hard to tell which proxy is the culprit.
For this demonstration, we will use the dynamic chain setting. Uncomment the dynamic chain line by deleting the “#” symbol right before dynamic_chain. Now, save the proxychains.conf file with ctrl+s.
Step 2: Add proxies to the proxychains.conf file
In order to find online proxies to add to the proxychains.conf file, you can use a paid VPN service or navigate to these free proxy links here, here, and here. Just keep in mind that with a free proxy list, we cannot guarantee the effectiveness of these proxies. Unlike VPNs, proxies only make your identity anonymous by giving you a different IP address…they aren’t usually encrypting your traffic. In addition, you don’t know who owns the proxy. It’s just the risk you take if you don’t do your research first.
There are HTTP, HTTPS, SOCKS4, and SOCKS5 proxies to choose from. Some SOCKS5 proxies may require credentials, but they can often be found online. Choose proxies that will ensure obscurity and will make it harder to track your IP address. For instance, if you live in the U.S., it’s a good idea to include a few Russian proxies in your proxy list.
Be sure to spend some time choosing the correct proxy servers. This means choosing proxies that actually are anonymous (e.g. ANM = Anonymous Proxy Server, HIA = High Anonymous Proxy). Also, be mindful of the latency. A lower latency is much better than a higher latency. Speed and uptime are also contributing factors as well.
Once you’ve found the proxies you wish to choose, add them to the bottom of the proxychains.conf file under the [ProxyList] section, like so:
 Notice the format goes type>IP_address>port>username>password. I did not use any proxies that required a username or password.
Step 3: Prevent DNS Leaks
We cannot truly remain anonymous if we’re leaking DNS information. As you know, we use DNS servers to resolve domain names to IP addresses. When you make a request to a web site, for instance, your computer makes a DNS request to a DNS recursive resolver, which is usually provided to you by your ISP.

Even if you are using proxychains, you may still be using the recursive resolver issued to you by your ISP. These resolvers will log and record your Internet activity. And if you’re conducting activities that are against their policies, you could be in trouble.
To prevent DNS leaks, pull up the proxychains.conf file again using the leafpad /etc/proxychains.conf command.

Now, uncomment the line where it starts with Proxy DNS requests – no leak for DNS data. Now save the proxychains.conf file (ctrl+s) and exit (ctrl+q).
Step 4: Verify the Configuration
We can verify that the proxies are working by executing the proxychains curl icanhazip.com command. This will use icanhazip.com to tell us our IPv4 or IPv6 address.

In the preceding output, we can see the dynamic proxy chain being created and completed, indicated by the OK message. The IP addresses bounce from one proxy to the next until it reaches the last proxy in the list, which is 83.169.208.218.
Step 5: Try it out
Now, let’s try an nmap scan to test this out. For any command you want to remain anonymous, use the following syntax: proxychains [program] [argument].
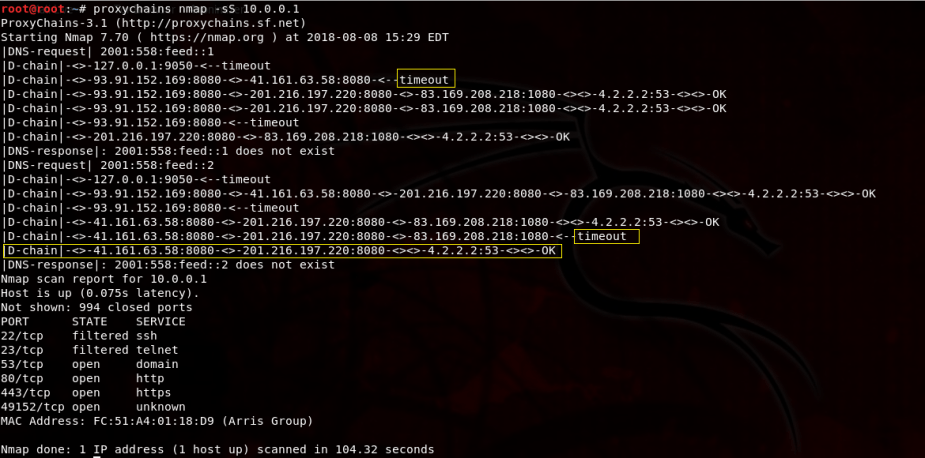
As you can see, there were a couple of timeouts, which is normal. But, that’s okay because it will just use the next proxy in the list or try again. That’s what’s so great about the dynamic_chain setting. Regardless of how the chain is completed, the user’s IP address will not be shown and we get the results of the nmap scan.
Step 6: Configuring Tor
Tor is going to prevent your ISP from figuring out what you are doing (btw you should not be running Tor as root).
If you would like to use Tor with proxychains, install Tor by opening a new terminal and executing the apt-get install tor command (I already have Tor installed). This may take a few moments. After that, start Tor using the service tor start command.

You can verify if Tor is already running by executing the service tor status command. You can then download the browser from the official Tor site.
Step 7: Change the proxychains.conf File to Use Tor
Next, go back to the proxychains.conf file by executing leafpad /etc/proxychains.conf in a new terminal. Scroll all the way to the bottom where it says [ProxyList] and uncomment the line that says defaults set to “tor”.

Now save the proxychains.conf file (ctrl+s) and exit (ctrl+q). Tor defaults sending the traffic first through our host at 127.0.0.1 on port 9050.
Step 8: Try it out
Now, let’s try the same nmap scan and see what happens.
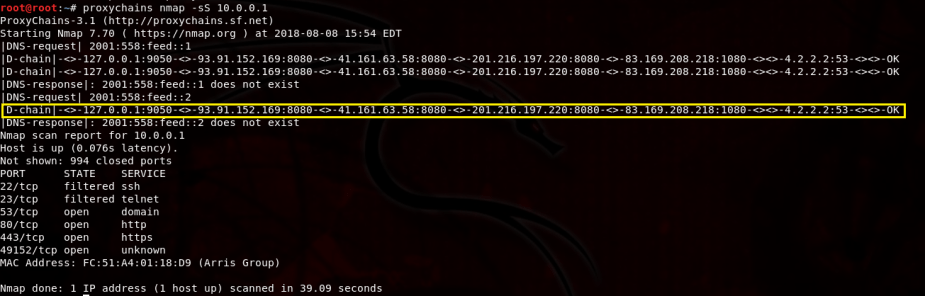
We successfully completed the nmap scan, but this time we passed the traffic through our host at 127.0.0.1 on port 9050 first and then proceeded to complete the proxy chain.
Step 9: Verify There Are No DNS Leaks
By the way, how can we know for sure that our DNS information isn’t being leaked? We can do this by opening a new terminal and executing the command: service firefox dnsleaktest.com. This will open Firefox and take us to dnsleakstest.com. Right off the bat, notice my IP address

I am certainly not in Jirkov, Czech Reuplic; in fact, this is the IP address of one of my proxy servers. Nevertheless, click the Standard test option and wait. It took a few moments, but here are my results.

My results show that I am using DNS Servers in Germany…I can assure you that that those are not my ISP’s DNS servers.
Things to Keep in Mind
As I said earlier, if you are using free proxies, keep in mind that you have no idea who owns those proxies. They could be honeypots for all you know. So, be sure to do you research.
Another thing to keep in mind is that the more proxies you use, the slower your connections will be. This is of course because it takes some time to create the proxychain if you are using a long list of proxies.

So, do you have to uncomment the line “Proxy DNS requests – no leak for DNS data” too, or just “proxy_dns” underneath it? On my proxychains.conf file, just “proxy_dns” was uncommented when I opened it. So I just left it like that. Is that fine, or should I also uncomment “Proxy DNS requests – no leak for DNS data” too? Thanks.
LikeLike
Correct, you need to uncomment the “Proxy DNS requests – no leak for DNS data.””
LikeLike
Ah, gotcha. Thanks man.
LikeLike
Would this work with a VPN and would it add some extra privacy? Because I’m using Nordvpn and it has obfuscated servers on its own and a big server pool, but me being really paranoid, I want to have even more privacy/security. Should I try this or It would just disrupt my VPN and do the opposite of what I want?
LikeLike
Tor would absolutely work with a VPN. In fact, NordVPN is highly recommended
LikeLike