
As promised in Creating an Evil Twin or Fake Access Point Using Aircrack-ng and Dnsmasq [Part 2 – the Attack], here is another way we can create an evil twin.
In this demonstration, I am going to use hostapd instead of Aircrack-ng. I personally think hostapd is better solely due to the fact that we can set matching encryption parameters on the evil twin. This makes the evil twin seem more legitimate.
Hostapd is a program (or daemon) primarily used to create wireless access points that follow IEEE 802.11 and its various authentication mechanisms, including WPA2-PSK and 802.1X encryption.
The information provided on the cybersecurityman is for educational purposes only. I am in no way responsible for any misuse of the information provided. All the information here is meant to provide the reader with the knowledge to defend against hackers and prevent the attacks discussed here. At no time should any reader attempt to use this information for illegal purposes.The information provided on the cybersecurityman is for educational purposes only. I am in no way responsible for any misuse of the information provided. All the information here is meant to provide the reader with the knowledge to defend against hackers and prevent the attacks discussed here. At no time should any reader attempt to use this information for illegal purposes.
Step 1 Install dnsmasq
If you don’t already have it, the next step is to download dnsmasq. This can be accomplished using a similar apt command, apt-get install dnsmasq.

Dnsmasq comes with its own dnsmasq.conf file stored in the /etc/ folder. We can view this configuration file by executing the nano /etc/dnsmasq.conf or leafpad /etc/dnsmasq.conf command. Trust me, it’s an extremely long file, and luckily, we won’t be making any changes to this file, but we could definitely use it for this demonstration if we wanted to.
Step 2: Install hostapd
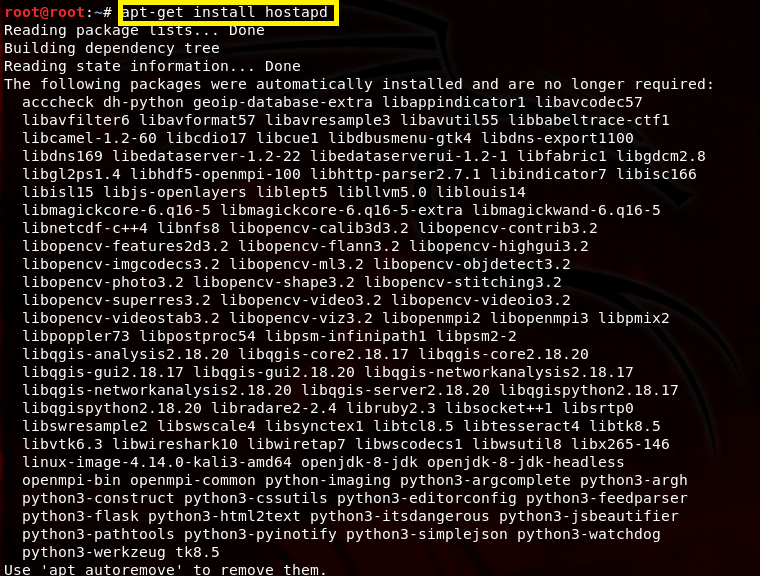
Now, we install hostapd by executing apt-get install hostapd in a terminal window.
It also comes with its own file, and it’s very long. We won’t be using that one either. Now, move on to step 3.
Step 3: Create an “eviltwin” Folder and Configure dnsmasq.conf and hostapd.conf files
Change the current path to the Desktop using the cd Desktop command and make a new directory called “eviltwin” by executing the mkdir eviltwin command. After that, navigate to the evil twin folder by executing cd eviltwin/. The current path should now be Desktop/eviltwin/. This is where we will create and store a new dnsmasq.conf file, so let’s create this new file by executing the nano dnsmasq.conf command.

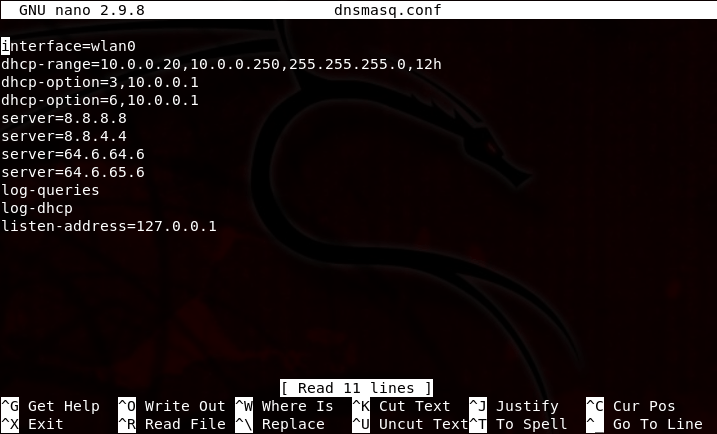
The preceding output is what you should see in the terminal. After we press [Enter], an empty GNU nano text editor file will open. Add the following parameters to this file, save it [ctrl+s], and quit [ctrl+x].
This tutorial isn’t going to be very helpful if you don’t actually know what these parameters mean. If you’re a network technician, then you probably know exactly what’s going on in this configuration file. Nevertheless, I’ll walk through what each line means.
- Interface=wlan0: The wlan0 interface is the wireless interface we will be using. Hostapd will start the evil twin or fake AP on wlan0.
- dhcp-range=10.0.0.20,10.0.0.250,255.255.255.0,12h: We will be using a 10.0.0.0/24 network for this demonstration (You could, however, use 192.168.1.0/24 if you wanted). A /24 means the subnet mask is 255.255.255.0 and that also means we only have 254 available host addresses that our fake DHCP server can lease out. However, I am only going to use host addresses between 10.0.0.20 through 10.0.0.254. Why? Because I want to. You can use whatever addresses you wish, but just don’t use 10.0.0.0, 10.0.0.1, or 10.0.0.255. This is because 10.0.0.0 is reserved for the network address, 10.0.0.1 will be our gateway address, and 10.0.0.255 is broadcast address (again, it helps to already have networking knowledge). Each DHCP binding will last for 12 hours
- dhcp-option=3,10.0.0.1: Enabling DHCP option 3 helps specify the gateway, which will be 10.0.0.1. That is my actual gateway address.
- dhcp-option=6,10.0.0.1: Enabling DHCP option 6 will automatically configure our DHCP clients to use the DNS servers we provide, rather than the DNS servers provided by the gateway.
- server=: On lines 5 – 8, I’ve specified several different public DNS servers here. With this configuration, dnsmasq will forward DNS requests from out clients to the following public DNS servers: 8.8.8.8, 8.8.4.4, 64.6.64.6, and 64.6.65.6. These are DNS servers provided by Google and VeriSign, respectively.
- log-queries: By logging queries, we get to see what web sites our DHCP clients are making DNS queries to. This information will appear in the terminal later on.
- log-dhcp: By logging DHCP information, we will get to see current DHCP bindings. This is helpful to see currently leased IP address information.
- listen-address=127.0.0.1. The listen-address is always the loopback address 127.0.0.1.
Now, we have to to create a hostapd.conf file under /Desktop/eviltwin. While still under the path /Desktop/eviltwin, execute nano hostapd.conf. Enter the following information, save it [ctrl+s], and quit [ctrl+x].

Again, here is what this information means:
- interface=wlan0: This is the interface used by the evil twin.
- driver=nl80211: nl80211 is used with all Linux mac80211 drivers
- ssidd=HOME-5432: This is the my network name I will be using. You have to use your own network name.
- hw_mode=g: This means I will be creating an 802.11g wireless network, capable of both 2.4 and 5.0 GHz frequency ranges.
- channel=11: This means I will be cloning the network on channel 11.
- macaddr_acl=0: This is for MAC address-based authentication using an Access Control List. Set this to 0 so we accept all MAC addresses…unless you want to deny a specific MAC address.
- ignore_broadcast_ssid=0: This means we disable the ignore broadcast ssid feature.
- auth_algs=0: You can put “0” for Open authentication or you can put “2” for WPA. If you set it to WPA2 with a passphrase and CCMP, it won’t matter which one you put, as you’ll see next.
- wpa=2: This means I am using WPA2, not WEP or Open authentication.
- wpa_passphrase=[password]: This is where you put the passphrase of the target network.
- wpa_key_mgmt= WPA=PSK: This means I will be using WPA Pre-Shared Key (PSK) authentication.
- wpa_pairwise=CCMP: This means CCMP-AES will be the encryption mechanism (as it should on all WPA2 networks)
- wpa_group_rekey=86400: This is the rekeying period in seconds for the Group Temporal Key (GTK).
- ieee80211n=1: This enables 802.11n support.
- wme_enabled=1: This enables Wireless Multimedia Extension support.
Step 4: Start Evil Twin Network Using hostapd
Before we start the evil twin, a few processes may interfere when using hostapd, such as wpa_supplicant. Open a terminal and execute airmon-ng check kill. This will kill those processes.

We can now start the evil twin or fake AP of my network by executing hostapd Desktop/eviltwin/hostapd.conf or if you are already in the correct path, just execute hostapd hostapd.conf.

My evil twin has now started by using interface wlan0. Leave this terminal window open.
Step 5: Configure Interface wlan0 and iptables
Now, just as we did with dnsmasq and Aircrack-ng in the last tutorial, we must configure the wlan0 interface and iptables to forward traffic to the real gateway. Open a new terminal and execute the following commands.

These commands will assign a gateway and network mask to the wlan0 interface. It will also create a static route in our routing table so that any traffic from out clients will be forwarded to the real gateway at 10.0.0.1, which is a part of the 10.0.0.0/24 network. To do this, we must route outbound traffic without disrupting the normal flow of traffic on the network. This is accomplished by creating new iptables chains.
Of course, you need to use YOUR network, not mine…Yours could be 192.168.0.0/24.
Step 6: Start dnsmasq to Provide Internet Connectivity for Connected Clients
Clear the terminal and start dnsmasq by executing dnsmasq -C Desktop/eviltwin/dnsmasq.conf. Or, if you are already in the correct path, you can execute dnsmasq -C dnsmasq -d. Leave this terminal window open.

These settings should look familiar. They are the same settings we configured in the dnsmasq.conf file located in Desktop/eviltwin/.
Step 7: Wait
Hostapd will jam my real HOME-5432 network while the evil HOME-5432 network remains online. Therefore, it should not take long to see a connection. Clients will have to “re-associate” with the evil twin network by providing the password. If the password is truly the same, then there should be no problem. So, I’ll enter the password on my iPhone. 
As soon as I do that, I notice some activity in my hostapd terminal window. Look closely in the window below and you’ll notice that I made an association request with the evil twin and requested to authenticate. You’ll also see at the bottom that the pairwise key handshake was completed since I entered the correct passphrase.

If I check out the dnsmasq terminal window, I’ll also see some useful DHCP information. We can see below how my iPhone has made a DHCP request for the 10.0.0.243 IP address. My fake DHCP server accepts the request with an acknowledgement and assigns the IP address and additional information needed for Internet connectivity, including DNS settings.
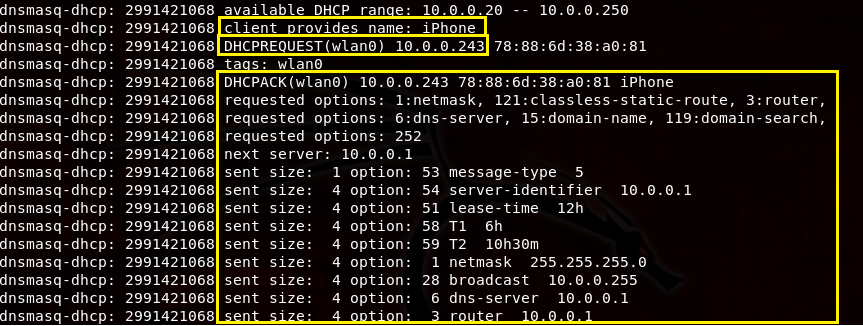
I can confirm this by going to my network settings in my iPhone and verify that my iPhone was in fact leased the 10.0.0.243 IP address.

But, does Internet connectivity really work? Let’s test it out. If I open up a Safari window and make a request for http://www.thecybersecurityman.com, it should work. When I do this, I can see the original DNS request below in the dnsmasq terminal window. It shows that 10.0.0.243 has made a DNS request for thecybersecurityman, whereby dnsmasq properly forwards this request to one of the Google DNS servers we entered in the dnsmasq.conf file.
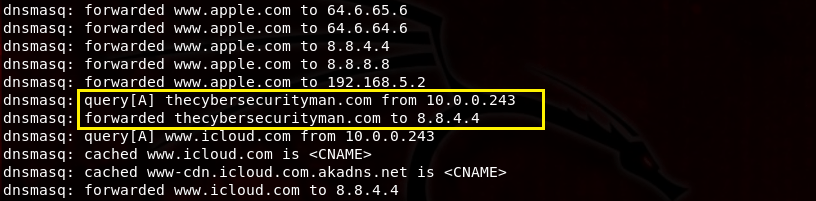
And, of course, it works…


? sudo dnsmasq -C Desktop/eviltwin/dnsmasq.conf -d
dnsmasq: bad option at line 1 of Desktop/eviltwin/dnsmasq.conf
How to resolve this?
LikeLike
The first line of the dnsmasq.conf file is:
Interface={INTERFACE}
So, that is where the problem lies. In my example, I’m using my wlan0 interface, so line 1 on the dnsmasq.conf file should reflect interface=wlan0. Make sure you don’t have any spaces and make sure the interface you are using is actually up. Also, this needs to be a wireless interface.
LikeLike