
Aircrack-ng is a suite of wireless penetration testing tools used to assess the security of Wi-Fi networks, specifically through various monitoring, attacking, testing, and cracking methods that you’ll learn here. Aircrack-ng is compatible with various IEEE 802.11 standards, which is great, but it will only work if you’re wireless NIC supports “monitor” mode. If you don’t own a compatible wireless NIC, I suggest the Alfa AWUS036NHA wireless adapter. Aircrack-ng is free to download for Windows, Linux, Mac OS X, FreeBSD, and OpenBSD. Since I’m running Kali Linux 2018.1, Aircrack-ng comes already pre-installed.
Aircrack-ng includes a long list of features, which I’ll grab right off the program’s Wikipedia page. The tools I will use in this demonstration are aircrack-ng, airmon-ng, aireplay-ng, and airodump-ng. Familiarize yourself with what each tool does by browsing through their description.

A list of Aircrack-ng’s features. Reprinted from https://en.wikipedia.org/wiki/Aircrack-ng
With Aircrack-ng, penetration testers have the ability to audit wireless access points, perform capture analyses, monitor wireless network activity, and test WEP/WPA/WPA2 passwords through an assortment of different attack types. Let’s begin.
The information provided on the cybersecurityman is for educational purposes only. I am in no way responsible for any misuse of the information provided. All the information here is meant to provide the reader with the knowledge to defend against hackers and prevent the attacks discussed here. At no time should any reader attempt to use this information for illegal purposes.
Step 1: Enable Monitor Mode
As I mentioned above, Aircrack-ng will only work on wireless NICs that support “monitor” mode. Monitor mode is one of the six modes that our wireless NICs support and they are reserved specifically for wireless networks. By default, wireless NICs are set to “managed” mode, but they can also be set to ad hoc, mesh, repeater, and master mode. Unlike Promiscuous Mode, you don’t have to associate (authenticate) with an AP or wireless network to capture traffic. When set to monitor mode, the wireless NIC ceases sending any information in order to fully dedicate itself to a passive “monitoring” of all the wireless traffic it can receive within range.
In effect, the wireless NIC will not associated with any particular service set and, as a result, it will capture other 802.11 frames within range. While in monitor mode, you cannot use your network anymore unless you have an additional network interface card set up. Monitor mode will display wireless packets, full 802.11 frame headers, access points, wireless nodes, signal strength, and the channel being monitored.
To put your wireless NIC into monitor mode, type the airmon-ng start wlan0 command in a new terminal. You can see what the output looks like below.

Be sure to also type the airmon-ng check kill command in the terminal. This is because there are some currently running processes that can sometimes interfere with Aircrack-ng. For that reason, it’s best to temporarily disable them.
Step 2: Airodump-ng
Airodump-ng is a packet sniffing tool that works very similar to Kismet. This tool will display a list of Access Points (APs) and any clients (stations) that are associated to them. To start airodump-ng, type the airodump-ng wlan0mon command in the terminal. The output of the command will look like the following:

Let airodump-ng run for a few minutes to find your access point. Within moments, I found my target AP, which is CC:40:D0:4F:5A:4B or HOME-5432_EXT_2.4. This AP is broadcasting on channel 1 and is using WPA2-PSK. I also highlighted a row at the bottom of the terminal because it reveals that their is currently a client (me) associated to this AP.
Take note of your AP and record the BSSID and the channel it’s broadcasting on.
Step 3: Target the AP
The next step uses the airodump-ng tool once more, except this time, we’re specifically capturing wireless traffic associated with the AP and writing it to a new file called “WPA2handshake.”
In order to crack the password for a WPA2-PSK network (mine is HOME-5432_EXT_2.4), airodump-ng must capture a WPA handshake between a client and the AP. The “PSK” in WPA2-PSK stands for “Pre-Shared Key.” Both the client and the AP know
the PSK, or “Pairwise Master Key (PMK),” but they need to prove to each other that they know the key without disclosing it over the air. This technical feat is accomplished by creating a Pairwise Transient Key (PTK) and exchanging encrypted messages to each other. The process takes 4 steps, and is something I’ll certainly explain in another blog post, but for now, all you need to do is capture this handshake.
Close the original airodump-ng window and type airodump-ng –bssid CC:40:D0:4F:5A:4B -c 1 –write WPA2handshake wlan0mon into a new terminal. Note: you need to type in the BSSID of your AP instead, and not mine. You also need to write the channel your AP is on.

This command displays wireless information for my AP. You’ll have to wait for a client (station) to associate with the AP. Then, you can move on to step 4. Be sure to keep this window open for now.
Step 4: Deauth
Once a client has associated to your AP, it’s time to deauthenticate, or “deauth” them off the network. The purpose of kicking them off the network is so that when they re-authenticate, airodump-ng will capture the WPA handshake.
Aireplay-ng is a packet injector. Type the aireplay-ng –deauth 50 -a CC:40:D0:4F:5A:4B wlan0mon command into a new terminal. This command will inject 50 deauthentication frames onto my HOME-5432_EXT_2.4 network. Again, you need to type your target AP’s BSSID.
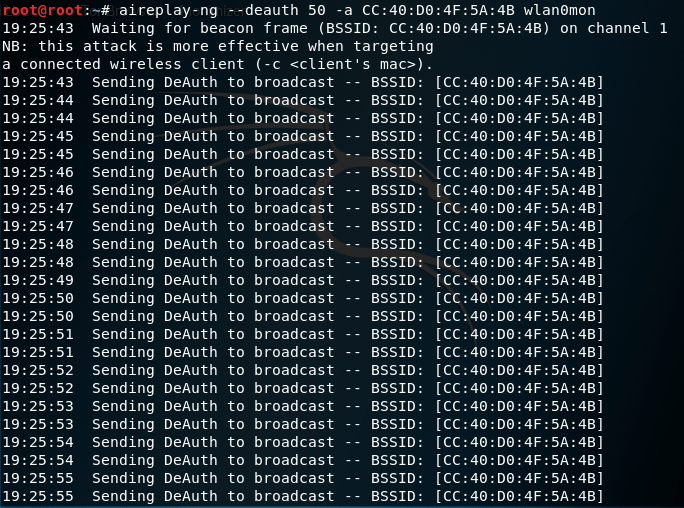
The terminal will then propagate with Deauthentication frames each second. Here is what this deauth looks like on Wireshark:

Any client associated to the target AP will now be kicked off the network. Once the deauth has completed, you can close the terminal, but still keep the airodump-ng terminal open.
Step 5: Wait for a Captured Handshake
It may take a few moments, but you’ll know you’ve caught the WPA handshake when the message, WPA handshake: [BSSID] appears in the airodump-ng terminal.

You can now close all terminals.
Step 6: Crack the Password
With the WPA handshake captured, we can crack the password using aircrack-ng, which uses a dictionary attack. Because of that, you’ll need a good word list. I personally like the rockyou.txt wordlist because of how huge it is, but there are a few other not so good options pre-installed in Kali Linux. If you choose to use rockyou.txt make sure you unzip it first and don’t try to open it. That’s a good way to freeze your system. The rockyou.txt file is in /usr/share/wordlist/rockyou.txt.
Type the aircrack-ng WPA2handshake-01.cap -w /usr/share/wordlists/rockyou.txt in a new terminal window. This will start aircrack-ng. The amount of time you’ll have to wait for the password crack will depend on the complexity of the password. I chose a very easy temporary password for my network, so it didn’t take long at all to crack the password!

As you can see, the password is “password.”
From what you can probably already tell, it really pays to have a lengthy password to defend against this type of attack. The password should also be slightly complex, but not too complex that you forget it.

[…] could bruteforce the network password using Aircrack-ng. This is something I already demonstrated here. For this demonstration, we’re going to use option 1: FakeAP – Hostapd. Type 1 and then […]
LikeLike