
Network Mapper, otherwise known as “nmap,” is a powerful open-source program, perfect for conducting reconnaissance and enumeration. Yes, nmap is well-known for this purpose and it’s included in every whitehat-to-blackhat’s toolbox for that very reason; however, I want to point out that it has many other uses as well. For instance, a network administrator may rely on nmap to audit or verify systems that are currently running on the network. This makes it a suitable option for compliance checking. Although there are plenty of practical uses to discuss, this post sets its focus primarily on reconnaissance and enumeration. This would be the second and third phase of the Certified Ethical Hacker’s methodology. Or, if you prefer NIST’s SP800-115, that would be phase two
How Does nmap Work?
Nmap works by sending out raw IP packets to a network or a single host. This allows nmap to identify which hosts are currently up and which hosts are currently down. And, depending on the type of scan being used, certain systems respond to these scans in unique ways, thereby identifying what these systems are. For example, nmap’s database includes scans that will identify a target system’s operating system (and version), services (name and version), and even packet filters or firewalls. It’s difficult to mention all of its wonderful characteristics, but the bottom line is that nmap is powerful. It has won numerous awards, it’s well-supported, and it’s also well-documented. Best of all…it’s free.
Some Great Terms to Know
“Reconnaissance,” or phase two, is a systematic attempt to locate, gather, identify, and record information about the target. It’s also known as “footprinting” the target. Penetration testers and hackers alike, will use a smorgasbord of resources to gather open source intelligence (ONSIT). These will include tools, such as Google hacking, Shodan database queries, social engineering, dumpster diving, e-mail harvesting, Whois, e-mail dossier, domain-dossier, discover.sh, domain lookups, Maltego, or social media profiling. Prime sources of information are phone numbers, e-mail addresses, security-related information, and job-postings.
When moving into phase three, “Scanning and Enumerating,” the information obtained during phase two is used to conduct useful scanning of target systems. “Scanning” is used to actively connect to a target system and obtain a response that identifies open ports and services. There are many different types of scans, and many of them you’ll learn momentarily. The purpose of a scan is to identify which hosts are up on the network. “Enumeration,” however, is the process of actively connecting to target systems to determine open shares, running services, user accounts, software versions, and other detailed information. Nmap has the ability to perform both of these tasks.
Open/Closed ports: SYN stealth and TCP Full Connect scans tend to be used to find open and closed ports. You’ll learn more about this when I discuss the various scanning options, but basically, if a port responds with a SYN+ACK, it indicates the port is open. If it responds with a RST, that’s indicative of a closed port.
Filtered/Unfiltered ports: If no response is received after several retransmissions, the port is marked as filtered. The port is also marked filtered if an ICMP unreachable error (type 3, code 0, 1, 2, 3, 9, 10, or 13) is received.
How to Use nmap
I could sit here and walk you through every scan type and option nmap has to offer, but not only is this impractical and probably impossible, it would also be a waste of time. If I were to do this, it would be the same as reading the manual, which is available to you. The better option would be to simply demonstrate nmap’s capabilities and note some of it’s most special and useful features.
For this demonstration, I can use the 10.0.0.0/24 network. It is safe, legal, and fast. The unauthorized scanning of systems you do not own borderlines the legalities imposed under the United States Code, Title 18, Chapter 47, Sections 1029 and 1030 (Crimes and Criminal Procedure). It’s a grey area regarding port scanning, but there are individuals who have had charges brought against them for not seeking written permission from their target beforehand. You can read more about the legal issues surrounding nmap here.
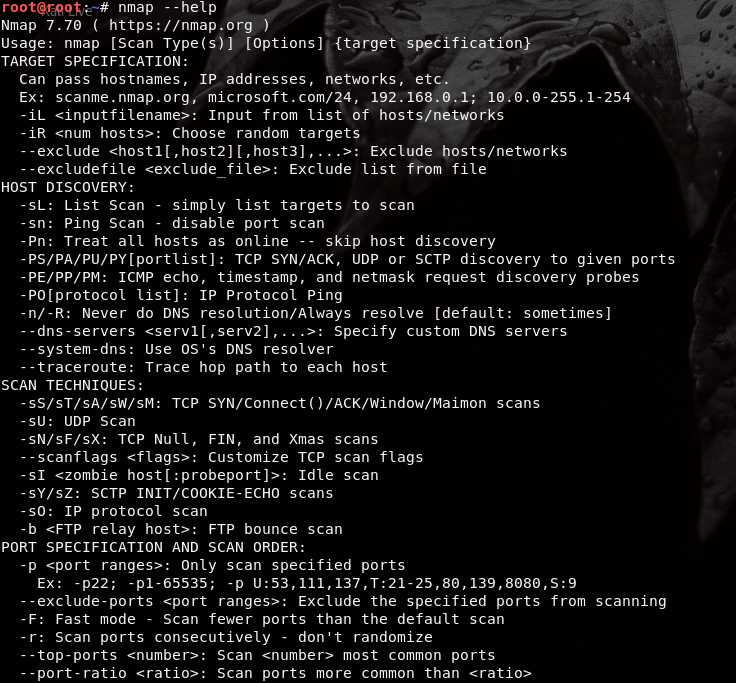
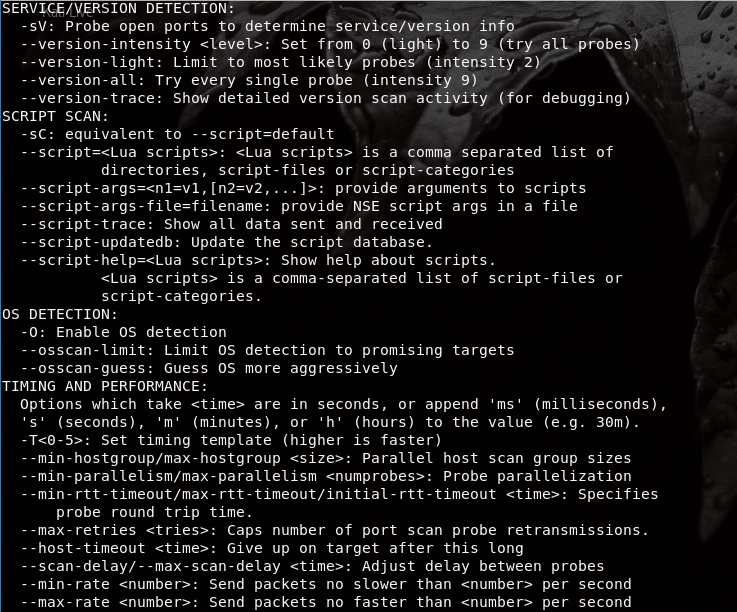
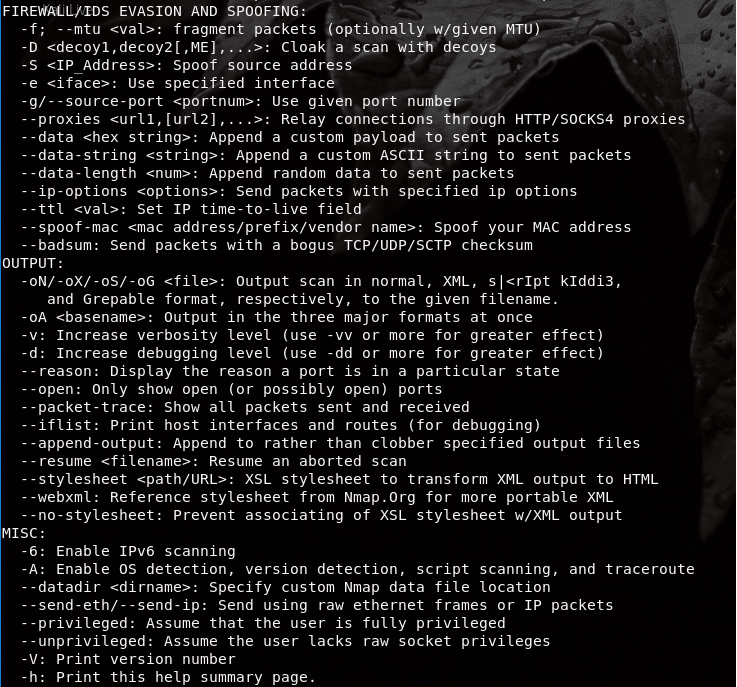
nmap –help reveals the following output. As you can see, there are a LOT of options to choose from.
I cannot cover every nmap syntax, but I can teach you some of the more basic and commonly used nmap scans:
nmap -sS
This is a SYN scan. It is the most popular scan because it’s stealthy. For that reason, you’ll often hear it referred to as a “SYN Stealth scan.” The stealth aspect of the SYN scan comes from the fact that nmap will not fully complete the TCP 3-way handshake with the target system. In any typical client-to-server connection initiation, the client sends a SYN to the server, the server sends a SYN+ACK to the client, and the client responds with an ACK to start finish the connection and initiate the sending of data. However, nmap will not send the last ACK to the target system and sends a RST instead. This leaves an incomplete connection and protects your IP address or hostname from being discovered. Keep in mind, it will not stop the scan from being seen on the network though.
nmap -sT
This is a TCP Connect Scan. It is not very popular for penetration testers and hackers because it ompletes the full TCP 3-way handshake. This makes the TCP scan a less-stealthy alternative because network defenders can now log the fact that you made this connection. But, if evading detection isn’t your objective, the TCP scan is a great option.
nmap -O
This scan enables Operating System detection mode by using fingerprinting of the TCP/UDP packet it received back from the target system. As mentioned earlier, different operating systems respond uniquely to a scan. Based on the results, nmap will give you an idea of what the likely operating system is. Sometimes, nmap cannot make a solid conclusion, but there is an extra feature that will enable nmap to give you an “aggressive guess” of the operating system. Thus, the -O option can be used in conjunction with –osscan-guess or –osscan-limit.
nmap -sV
This scan enables Version detection mode. Running this scan determines the version of the services and applications being run on the ports. The -sV option is an important feature to include in your scans as it can be used to gather information on known vulnerabilities and exploits from ONSIT resources.
nmap -p
This scan specifies the ports you wish to scan. For example, if you only wanted to inlcude SSH and SMTP ports in your scan, then you would use -p22,25. If you wanted to use a scan that only uses ports 1024 to 49,152, then that would be -p1024-49152. Nmap only scans TCP ports by default, so if you would like to include UDP port 53 with your TCP port scans, for example, that would be -p U:53,T:20,21,23,25.
nmap -Pn
Normally, nmap will scan a system by pinging it first and then enumerating it. This scan, however, skips the host discovery and treats all systems as if they were online. Instead of pinging the system first, it checks the ports on only that IP address or that IP address range.
nmap -T
This enables the Timing and Performance option. How fast do you want your scan to be? From a scale of -T0 to -T5, the aggressiveness of the scan gets higher and higher as the number increases. A -T0 would be “paranoid,” which equates to probably one port scanned every 5 minutes. This is extremely useful for hackers, penetration testers, or even APTs who must evade detection at all costs. Most penetration testers, however, will use -T4. A -T5, on the other hand, is insanely fast.
nmap -sN
From the attacker’s perspective, the NULL scan is not always reliable since not all hosts comply with the specifications of TCP. In a NULL scan, an attacker sends a data packet without any flag set, meaning all the bits are 0. If the port is open, the target host ignores the packet and does not respond. But, according to the rules of TCP, when a packet is sent to a port with no bits set, the target is supposed to respond with an RST packet if the port is closed. Some hosts send an RST packet in response to a null packet, regardless of whether the port is open or not. That is why the NULL scan is considered unreliable since you can’t really come to any conclusion using a NULL scan.
nmap -sF
Just like a NULL scan, the FIN scan is unreliable. In this case, the attacker sends a FIN packet to the target. The FIN packet is able to bypass firewalls because firewalls try to avoid any errors with legitimate FIN packets. The target simply ignores the FIN packet if the port is open. The target responds with an RST if the port is closed. Some hosts will send an RST packet regardless of the port being open or closed, making the FIN scan just as unreliable as the NULL scan.
nmap -sA
Attackers use an ACK scan to learn which firewall ports are filtered and which are unfiltered, not whether the port is open or not. An attacker sends an ACK packet to the target port’s firewall. If there is no response or an “ICMP destination unreachable” message is returned, then the port is considered to be filtered. This is likely because firewalls block ICMP packets from outside of a network. This also means that the firewall is stateful because it knows that no internal host has initiated any SYN packet that matches the ACK packet sent by the attacker (Recall that stateful firewalls keep track of sessions). If the target’s firewall returns an RST, then the port is unfiltered since the firewall has allowed the system to respond. This simply means that there is a firewall, but there is no firewall rule for that specific port.
nmap -sX
The XMAS scan gets its name from the fact that a combination of three flags sent to the target (URG, PUSH, and FIN), light up with different colors and flash similar to Christmas tree lights (or somebody must have thought it did). An attacker sends this crafted TCP packet to the target. If the port is open, the system should not respond. On the other hand, a closed port responds with an RST packet. You have to be careful though. Some systems, especially routers, can be vulnerable to an XMAS Tree scan. When a vulnerable system receives this packet, it doesn’t know what to do. As a result, it might reboot or even crash.
nmap -v
The -v option can be appended to any scan for verbosity, which means there will be more information added. For a greater verbosity effect, you can use the -vv option.
nmap -iL
When the -iL option is set, nmap will scan targets from a text or input file that you have provided. Accordingly, this scan takes any targets, domain names, or IP addresses from the file and feeds it through the nmap scan you choose. This is commonly used for scripts.
nmap -oN, -oG, -oX, and -oA
These are output file formats. You can save the results of your nmap scans by using any one of the 4 options above. The -oN option saves your results to a normal output file. The -oG option saves the output of your scan into Grepale format. The -oX option saves the output of your scan into XML-based format, which is good if you must feed your results into a web database. And finally, the -oA option saves your results into results into all 3 preceding file formats. Be sure to name the file. For example, the nmap -sS -o -sV -v [target] -oG Desktop/results.txt saves the results of this scan to your Desktop folder asb “results.txt.”
To browse more basic scans, you can click here.
Nmap Demonstration
I’ll show you a demonstration of how to scan and enumerate a target network using many of the aforementioned scans. My main objective is to make you become familiar with more advanced nmap scans and features.
Step 1: Find What Systems are Up:
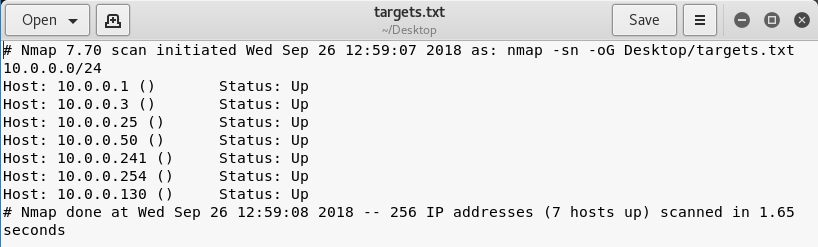
To find what systems are currently up on the network, you could do a simple ping scan of the 10.0.0.0/24 network using the -sn option. When you use this option, nmap will send an ICMP echo request to every IP address (10.0.0.1 to 10.0.0.254). The systems that reply with an ICMP echo reply are up. Notice that I’ve added the -oG option to save my results into a file on my Desktop in grepable format.
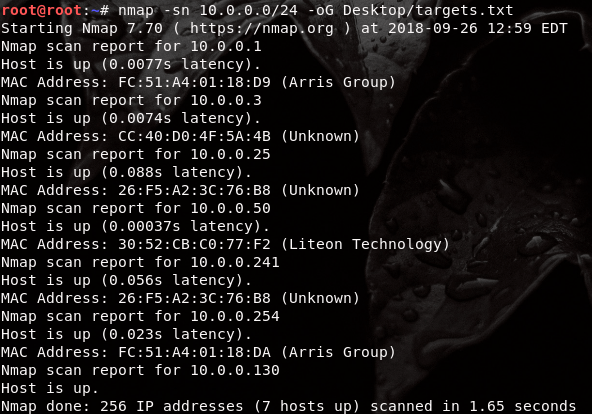
The results of this scan indicate 7 hosts are up: 10.0.0.1 , 10.0.0.3, 10.0.0.25, 10.0.0.50, 10.0.0.130, 10.0.0.241, and 10.0.0.254 are up on the network. However, this isn’t very useful information that will help us find a vulnerability. The targets.txt file was saved to my Desktop, which I can now review:
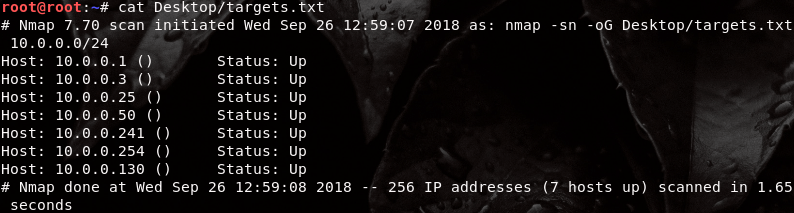
This is grepable format. I’m not particular interested in any of the extra details. All I want to know at this moment is which hosts are currently up on the 10.0.0.0/24 network.
To make scanning a little easier and quicker, I’m going to save only the currently running systems (IP addresses) into a new file on my Desktop and name it “ip_addresses.txt.” I use the grep and awk to strip away only the information I want included in this new file.
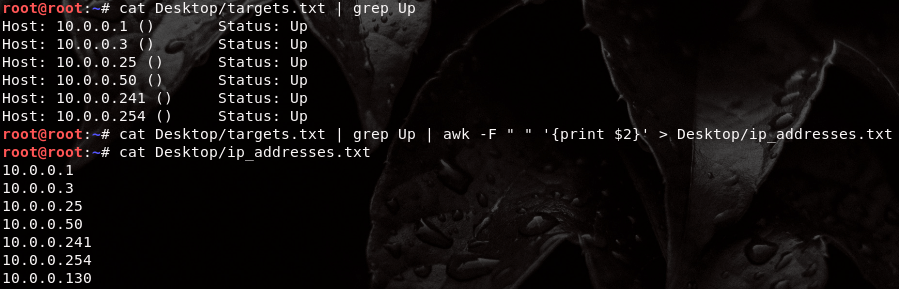
The new ip_addresses.txt file looks like the following, which is nice and neat.

The reason I’ve done this will become clear in Step 2. As, you’ll soon find out, this saves a lot of time.
Step 2: Find Open Ports
A SYN Stealth scan will find open, closed, and unfiltered ports on the 10.0.0.0/24 network. The SYN stealth scan can take quite a while to complete depending the -T indicator or the total number of hosts being scanned. For example, scanning the 10.0.0.0/24 network would mean that I would have to go through 254 hosts again. Keep in mind, the SYN scan scans 1000 commonly open ports on every host.
But, since I know which hosts are currently up, I can use the ip_addresses.txt file I just created in Step 1 by using the -iL option. If you recall from earlier, this option allows you to scan targets from a file. Therefore, instead of scanning all 254 hosts again, I’ll only scan the 7 hosts that are up on the 10.0.0.0/24 network, which saves a lot of time. I’m using the -T4 option because I don’t need to be stealthy.


At this point, by seeing what ports are open on these systems, we can get an idea of what these systems likely are. I’m interested in 10.0.0.241 because I know that ports 139 and 445 are usually indicative of a Windows system. Port 139 is used in NetBIOS for file and printer sharing and port 445 is an SMB port, both of which are highly vulnerable.
Step 3: Find Additional Services
Since 10.0.0.241 is my target, I’ll enumerate it a little more by getting some additional information on its operating system and the version of the services it’s running using -O and -sV. This time, I used the -v verbose option to reveal more information during the scan.

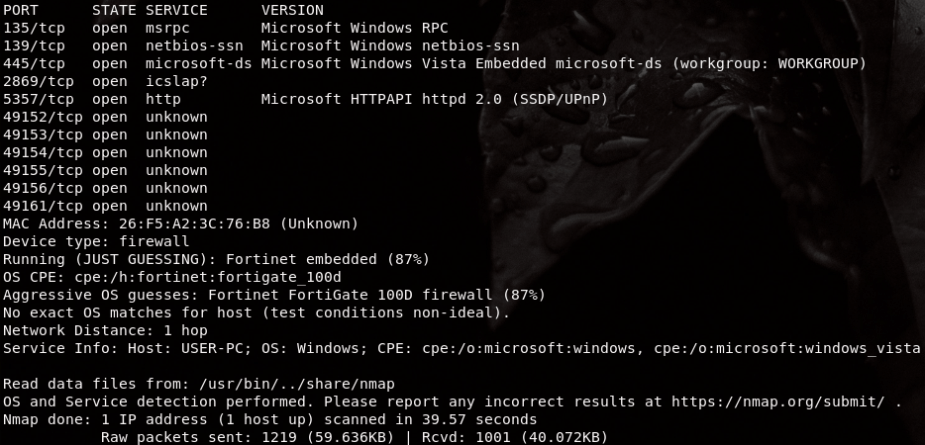
The versions of each service are now revealed as well as nmap’s guess of the operating system. The results reveal the version information for each service and any additional information; however; the operating system common platform enumeration (CPE) reveals that this is a Fortinet firewall with an 87% confidence level. I know this is incorrect. What’s likely happening is that nmap is being deceived by a host firewall.
I can run an additional scan that uses the -A and –osscan-guess options to reveal a more accurate answer. The -A option is a more powerful version of operating system and version detection because it uses additional NSE scripts.


In these scan results, we get the information we are looking for. Under the smb-os-discovery section for host script results, we see the operating system type and version: “Windows Vista (TM) Home Premium 6002 Service Pack 2,” which was released 9 years ago. Normally, these results will be saved to a file by re-running the scan with either one of the -oN, -oG, -oX, or -oA options set.
Step 4: Find Vulnerabilities
Windows Vista reached its end of support in April 2017. Here are some open source details for CVE vulnerabilities relating to Microsoft Windows Vista x64 Home Premium and SP2. The latest vulnerability comes from 2012, so the system has likely been patched already, but there’s no way to know for sure unless you try exploiting these vulnerabilities. There are a couple of DoS vulnerabilities and a few privilege escalation vulnerabilities. The Home edition of Windows Vista isn’t popular for vulnerabilities because it cannot connect to a Windows Server domain. Researchers and hackers tend to focus most of their time around the Business and Enterprise editions.


The National Vulnerabilities Database (NVD) hosted by the NIST shows a total of 204 vulnerabilities for Microsoft Windows Vista SP2, but it doesn’t indicate the Edition type: Starter, Home Basic, Home Premium, Business, Enterprise, or Ultimate.

An OpenVas vulnerability scan did not reveal much more information, unfortunately.

The results of the OpenVAS scan reveals a list of DCE/RPC or MSRPC services running on this system by simply connecting to port 135, which can be used to gain even more additional knowledge. The report also indicates that this system implements RFC1323, which can be used to compute the uptime of the system. That’s not really a useful vulnerability. The biggest vulnerability, however, is that the operating system has reached its end of life support.
Since I know port 445 is open, I ran some additional nmap scripts to check for any SMB vulnerabilities, such as Eternal Blue, which is exploited by both WannaCry and Petya ransomware.

Oddly, the state of the port seems to now be “filtered,” which would indicate the system is being protected by a host firewall. All this information can be used to discover a known exploit. If you find that the current system you’re enumerating doesn’t seem promising, then move onto the next system and find other vulnerabilities.
Using nmap Scripts
nmap can use scripts. The Nmap Scripting Engine (NSE) allows nmap users to write and share scripts to automate a wide variety of networking tasks. These scripts are written in Lua programming language and are a powerful extension to nmap users, allowing them the ability to discover highly specific vulnerabilities and exploits. You can update your database by simply executing nmap –script-databaseb. Now, sticking to my previous target, if I were to use a specific nmap script against a Windows system, I would pay particularly close attention to any SMB vulnerabiliy and exploit scripts because port 445 is one of the most dangerous ports.

Unfortunately for me, port 445 is filtered. Aside from trying to evade a firewall (a skill that takes patience and practice), I can simply move to another system on the 10.0.0.0/24 network and find additional vulnerabilities. You can browse NSE scripts here. You’ll find hundreds and hundreds of scripts catered to a specific purpose or service. You may use these scripts to scan a particular host or an entire network.
Speaking of scripts, I’ll include a useful bash script that I created to help automate your nmap scans in Kali Linux. Provide the script with a file that lists out your targets. The script will then automatically scan the targets depending on the scan you provide. By default, it performs a ping scan, but you can modify line 38 to be any type of scan you want.
#!/bin/bash # Name: nmap_script # Author: Dan # Date: September 2018 # Website: thecybersecurityman.com # # Purpose: This bash script will scan a list of targets # provided by the user. The input is saved in the # $FILE variable. This script will read the list # of targets in the $FILE and scan them. By default # this bash script will perform a ping scan. You # can modify the scan by changing line 38. # # The script will save the output of the nmap scan # as a file as /Desktop/scan_results.nmap read -p "Would you like start your scan?: " ANSWER case "$ANSWER" in [yY]|[yY][eE][sS]) echo echo "You answered yes." ;; [nN]|[nN][oO]) echo echo "You answered no." exit ;; *) echo echo "Invalid answer." exit ;; esac echo read -p "Enter the directory path of the file: " FILE if [ -e "$FILE" ] then echo "Scanning targets in $FILE." cat $FILE nmap -sP -iL $FILE -oN Desktop/scan_results.nmap else echo "Invalid file." echo "Ensure you've entered a correct diretory path to the file." exit fi if [ "$?" -ne "0" ] then echo "Sorry, something went wrong." exit fi echo echo "Your scan is completed" echo echo "Your results are saved onto your Desktop." exit
A Note on Time and Performance
As was mentioned at the beginning of this post, the -T option indicates how fast or aggressive you want your nmap scans to be. This option becomes important when it comes to evading detection from network defenders. As you can see from the output below, a -T5 scan reveals an obvious scan output on tcpdump. This scan is sending hundreds of packets out per second. As you can see from this snippet of the tcpdump output, there are quite a bit of responses coming back to my machine each second…not good if you want to be stealthy.

However, with a -T1 option, we can drastically slow this scan down. With this option, the scan isn’t even seen in this snippet of the tcpdump output. All you see is the usual broadcast and multicast traffic on the network. This is because a -T1 option scans one port every 5 minutes or so.

This is great for evading detection, but it’s ridiculously slow. This scan would take roughly 45 minutes to complete, and it’s not even an intensive scan! So, unless you’re on the level of APT, you can find a compromise in between the two extremes.
Conclusion
This is all I will be covering in this post. Nmap is a wonderful and powerful program that should be included in everyone’s toolbox. nmap covers many aspects of penetration testing, and thus, it is a great skill to have. There are many other features available in nmap that I hope to discuss in future posts.
